Google AdMob, as a globally renowned advertising platform, offers a wide range of ad formats and flexible monetization strategies (essentially the top player in overseas markets). It also provides a powerful and user-friendly mediation platform that covers almost all well-known ad networks on the market. However, for developers who are just starting to venture overseas, integrating AdMob mediation may feel unfamiliar, and there are some differences compared to mediation integration with other networks. This article will detail the AdMob mediation integration process and some potential issues and usage experiences that may arise, so whether you are a novice or an experienced developer, it is advisable to read carefully.
The content of this article will be organized in the following order, and you can directly select the sections you are interested in:
What is AdMob Mediation
Why Choose AdMob Mediation
AdMob Mediation Integration Process [Key Point]
Summary of Personal Experiences with AdMob Mediation [Key Point]
1. What is AdMob Mediation?
AdMob Mediation is a service provided by Google AdMob that allows developers to integrate multiple ad networks into their applications, managing and optimizing ad revenue through the AdMob platform. This approach not only simplifies the ad management process but also enhances ad revenue through a bidding mechanism.
If you are still unfamiliar with the concepts of mediation and bidding, you can refer to my previous article: “For Beginners Doing IAA Overseas, Here’s What You Must Know About Advertising!”
2. Why Choose AdMob Mediation?
Unified Management: With AdMob Mediation, developers can manage multiple ad networks from a single interface.
Revenue Optimization: AdMob Mediation ensures that developers receive the highest possible ad revenue through its bidding mechanism.
Flexibility: Developers can choose the most suitable ad networks based on the characteristics of their applications and user preferences.
Data Analysis: AdMob provides powerful data analysis tools to help developers understand ad performance and user behavior.
3. AdMob Mediation Integration Process [Key Point]
1. Register an AdMob Account
(First, I will create a dedicated article on how to register for an AdMob account.)
First, you need to have a Google AdMob account. If you don’t have one, you need to register. After registration, log in to the AdMob website and create a new AdMob application.
2. Create Ad Units and Integrate SDK
Create the necessary ad units in the AdMob backend, then integrate the AdMob SDK based on your application platform (iOS or Android) and connect the ad formats you need. Since this article primarily discusses the mediation (aggregation) aspect, I will not elaborate on this part.
For detailed SDK integration processes, you can refer to the official documentation: Domestic Official AdMob Integration Documentation (The documentation is clear and simple, and can be accessed without external networks.)
Note: If the official website shows an Internal Server Error, change the document language to English.
3. Create a Mediation Group
Select the AdMob panel to create a mediation group, choosing the application and corresponding ad formats.
4. Configure the Mediation Group
Name: You can name it anything you like for distinguishing different applications or functions of the mediation group.
Mediation Group ID: Pay attention to this ID; it is not used for ad requests. Many mediation platforms use the mediation group ID to request ads, but AdMob does not—do not confuse the two. Many beginners might misunderstand this when they first encounter AdMob.
Geolocation: If you want to distinguish ad requests from different regions, you can set up or exclude certain countries here. For instance, if you do not want to target certain areas where there is excessive ad fraud, you can exclude users from those regions.
Ad Units: These are the ad units you created in the previous step. This ID will be used in your code to request ads. You can map multiple ad sources to assign them to this ad unit ID for requests. As shown in the image, I only selected one reward ad unit, and I configured four third-party ad sources, so when requesting ads, it will randomly request from different sources (filled according to bidding order).
Ad Sources:
Bidding: This refers to the bidding ad sources; you can set multiple sources. The same ad source can have multiple ad unit mappings.
Waterfall: This follows the standard order of ad requests based on the set minimum price. (How to set the minimum price? We will cover that later, no rush.)
5. Set Up Code Mediation Configuration
For detailed code integration, refer to the AdMob mediation network documentation:
AdMob Mediation Network Documentation
As an example, let’s integrate the Facebook (Meta) ad source: Add Facebook’s mediation dependency (adding this dependency will pull in the Facebook ad SDK, so you don’t need to add the Facebook ad SDK dependency separately):
implementation 'com.google.ads.mediation:facebook:6.17.0.0'
That's it! Of course, you need to test if the mediation has been successfully added. During AdMob initialization, you can check the status of the adapters.
In special cases, some mediation platforms may require specific configurations; you can also refer to the documentation for details.
6. Test Mediation Ads
Check if the integration code is functioning properly; during AdMob initialization, you can get the status of the mediation (Adapter) to see if it is normal.
Add test devices and enable test mode, which needs to be done in both the AdMob backend and the ad source (like Facebook) backend.
Enable AdMob’s Ad Inspector, as shown (double-tap the device in the app to pop up):
Then select the ad unit you want to test, and that’s it!
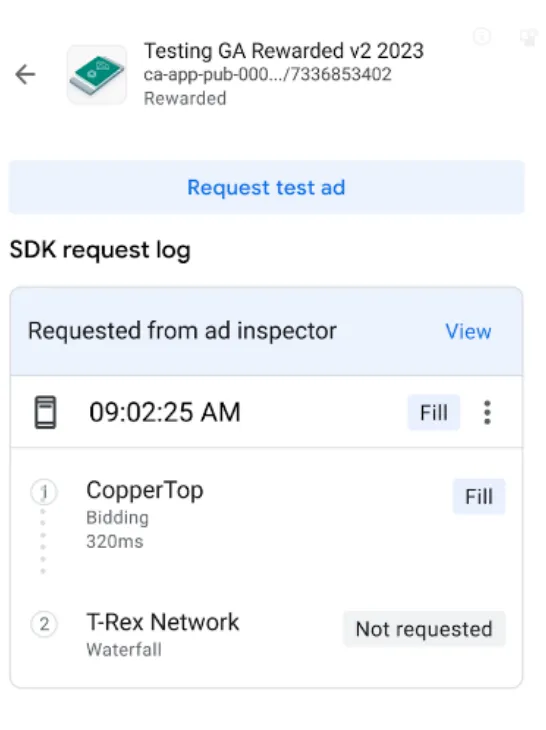
Single Ad Source Testing: You can restrict ad requests in your app to deliver ads only from a single bidding or waterfall mediation ad source. This can verify if the third-party adapter is correctly implemented and whether the ad source operates as expected.
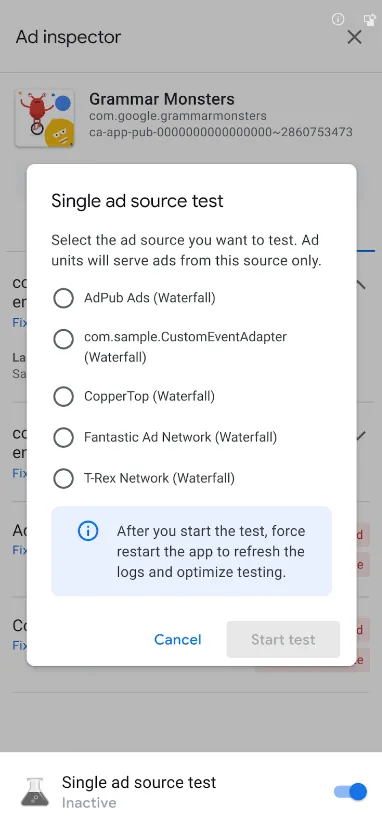
After selecting, it is advisable to follow the prompts to force restart the app to clear the ad cache.
Finally, restart the app. If successful, ads will populate under that ad unit in mediation.
If it fails, it will show "no fill," and you can check the SDK request logs.
Of course, the official documentation is the best reference.
AdMob Ad Inspector Documentation
With this, the mediation integration and testing are complete.
7. Release and Monitor
After publishing the app, use the monitoring tools provided by AdMob to track ad performance and revenue, optimizing based on data feedback.
4. Summary of Personal Experiences with AdMob Mediation [Key Point]
When signing third-party mediation agreements, make sure to use the correct account, as there may be issues with requests and ad fill.
Ad units within a mediation group can map multiple ad sources, and a single ad source can map multiple ad IDs.
The minimum price settings for waterfall ad requests can be adjusted across multiple dimensions. Here, I’ll share personal experiences; if you have better solutions, feel free to leave a comment. Generally, when an application is first launched, you can start without setting a minimum price and observe data for a while before making adjustments.
After running for a period and gathering enough data, analyze the performance of each ad format, ad placement, ad source, and region, etc., to understand the average eCPM across different dimensions. Based on the derived eCPM, set one or more minimum prices that are greater than, equal to, or less than the average value, adjusting the quantity according to different dimensions.
For example, if the average eCPM for rewarded ads in a particular region is $50, you can set minimum prices of $100, $80, $60, $40, etc., for that region. If you believe a certain ad source is particularly competitive, you can set a higher minimum price to ensure its priority in display.
Of course, this minimum price is not fixed; operations should continuously adjust it based on data changes to achieve the optimal solution for each period. Setting a minimum price that is equal to or below the average ensures that at least one ad can fill. A higher minimum price means a lower fill rate. You can also configure an ad that does not have a minimum price to act as a fallback.
Similarly, the minimum price settings for bidding ads can apply the above approach. Finally, the above are just simple case shares, and if there are inaccuracies, please point them out. Additionally, different individuals and projects have varying advertising experiences; if you have different ideas, feel free to discuss solutions to contribute to the overseas journey for our compatriots.
Of course, the current bidding features are quite intelligent. In most cases, automated bidding can meet the majority of needs. Many ad platform Account Managers also recommend using automated bidding.
Adding more ad sources will positively impact your eCPM.
Learning the platform's A/B testing can save you a lot of unnecessary detours.
Continuously monitor ad performance and adjust based on market changes and ad effectiveness, as eCPM can fluctuate.
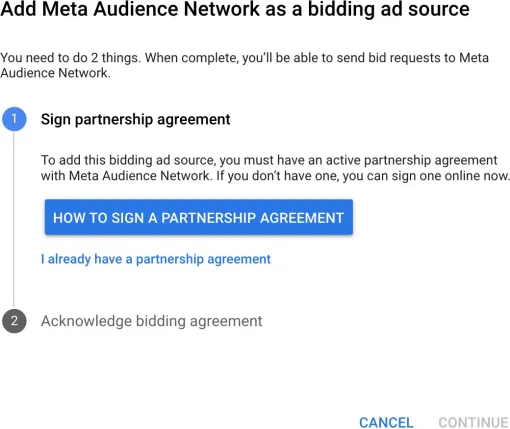
In AdMob's bidding ad sources, all ad platforms complete payments through AdMob except for the Meta Audience Network.
In addition to mediation groups, bidding, and setting minimum prices to increase revenue, it's essential to set more suitable ad content and formats based on the functions of the application/game. Do not just pursue more ad display opportunities; retaining users and providing a better (advertising) experience is the optimal solution.

