Transform
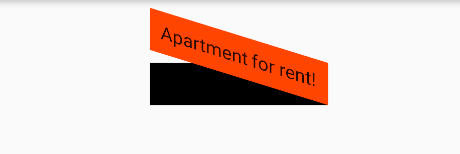
Transform can apply matrix transformations to its child component when rendering, allowing for various visual effects. Matrix4 is a 4D matrix through which we can perform different matrix operations. Below is an example:
Container(
  color: Colors.black,
  child: Transform(
    alignment: Alignment.topRight, // Alignment relative to the origin of the coordinate system
    transform: Matrix4.skewY(0.3), // Skew 0.3 radians along the Y-axis
    child: Container(
      padding: const EdgeInsets.all(8.0),
      color: Colors.deepOrange,
      child: const Text('Apartment for rent!'),
    ),
  ),
)
The result is shown in Figure:
Matrix transformations involve linear algebra, which is outside the scope of this book. Readers interested in matrix math can explore this topic independently. In this book, we’ll focus on common transformation effects in Flutter. Additionally, since matrix transformations occur during the rendering phase without triggering layout or rebuild processes, performance is generally very good.
32.1 Translation
Transform.translate takes an offset parameter that allows you to move the child component along the x and y axes by a specified distance during rendering.
DecoratedBox(
  decoration: BoxDecoration(color: Colors.red),
  // The default origin is the top-left corner. Move 20 pixels left and 5 pixels up.
  child: Transform.translate(
    offset: Offset(-20.0, -5.0),
    child: Text("Hello world"),
  ),
)
The result is shown in Figure :

32.2 Rotation
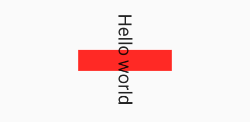
Transform.rotate can rotate a child component, for example:
DecoratedBox(
  decoration: BoxDecoration(color: Colors.red),
  child: Transform.rotate(
    // Rotate 90 degrees
    angle: math.pi / 2,
    child: Text("Hello world"),
  ),
)
Note: To use math.pi, you need to import the following package:
import 'dart:math' as math;
The result is shown in Figure :
32.3 Scaling
Transform.scale can scale a child component up or down, as in this example:
DecoratedBox(
  decoration: BoxDecoration(color: Colors.red),
  child: Transform.scale(
    scale: 1.5, // Scale to 1.5 times the size
    child: Text("Hello world"),
  ),
);
The result is shown in Figure :

32.4 Notes on Transform
Transformations applied via Transform occur during the rendering phase, not the layout phase. This means that no matter what transformations are applied to the child, the size and position on the screen remain fixed, as these are determined during the layout phase. Let’s explain this in detail:
Row(
  mainAxisAlignment: MainAxisAlignment.center,
  children: <Widget>[
    DecoratedBox(
      decoration: BoxDecoration(color: Colors.red),
      child: Transform.scale(scale: 1.5,
          child: Text("Hello world")),
    ),
    Text("你好", style: TextStyle(color: Colors.green, fontSize: 18.0)),
  ],
)
The result is shown in Figure :

After applying a transformation (scaling) to the first Text, the text is scaled up during rendering, but the occupied space remains the same (the red area), so the second Text is rendered right next to the red area, resulting in text overlap.
Since matrix transformations only affect the rendering phase, they can be used to create visual changes in the UI without triggering the build process, saving on layout costs and improving performance. For example, the Flow widget internally uses matrix transformations to update the UI, and many Flutter animation components also use Transform extensively to enhance performance.
Thought Experiment: If you apply a translation and then a rotation (or vice versa) to a child component using Transform, will the final effect be the same? Why?
32.5 RotatedBox
RotatedBox is similar to Transform.rotate in that both can rotate a child component, but there is a key difference: RotatedBox applies the transformation during the layout phase, which affects the position and size of the child. Let’s modify the previous Transform.rotate example:
Row(
  mainAxisAlignment: MainAxisAlignment.center,
  children: <Widget>[
    DecoratedBox(
      decoration: BoxDecoration(color: Colors.red),
      // Replace Transform.rotate with RotatedBox
      child: RotatedBox(
        quarterTurns: 1, // Rotate 90 degrees (1/4 turn)
        child: Text("Hello world"),
      ),
    ),
    Text("你好", style: TextStyle(color: Colors.green, fontSize: 18.0)),
  ],
)
The result is shown in Figure :
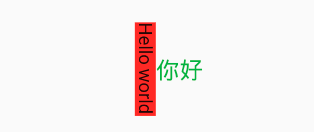
Since RotatedBox operates during the layout phase, the child component is rotated 90 degrees (not just its rendered content). The decoration will apply to the actual space occupied by the child component, resulting in the layout shown above. Compare this with the previous Transform.rotate example for a better understanding.

