1 Element
we introduced the relationship between Widgets and Elements. We know that the final UI tree is composed of individual Element nodes. We also mentioned that the layout and rendering of components are completed through RenderObjects. The general flow from creation to rendering is as follows: generate Elements based on Widgets, create the corresponding RenderObject, and associate it with the Element's renderObject property, then complete layout and drawing through the RenderObject.
An Element is an instantiated object representing the specific location of a Widget in the UI tree. Most Elements have a unique renderObject, but some Elements can have multiple child nodes, such as certain classes derived from RenderObjectElement, like MultiChildRenderObjectElement. Ultimately, all Elements' RenderObjects form a tree known as the "Render Tree." In summary, we can consider Flutter's UI system to consist of three trees: the Widget tree, the Element tree, and the Render tree. Their dependency relationship is as follows: the Element tree is generated from the Widget tree, and the Render tree depends on the Element tree, as shown in Figure.

Now let's focus on Element. The lifecycle of an Element is as follows:
The framework calls
Widget.createElementto create an Element instance, referred to aselement.The framework calls
element.mount(parentElement, newSlot). Within themountmethod, it first calls thecreateRenderObjectmethod of the corresponding Widget to create the RenderObject associated with the Element, and then callselement.attachRenderObjectto addelement.renderObjectto the specified position in the Render tree. (This step is not mandatory and typically occurs when the structure of the Element tree changes.) After being inserted into the Render tree, the Element enters an "active" state, meaning it can be displayed on the screen (or hidden).When the configuration data of a parent Widget changes, and the Widget structure returned by its
State.buildmethod differs from before, it is necessary to rebuild the corresponding Element tree. To facilitate Element reuse, before rebuilding, the framework will first attempt to reuse the Element at the same position in the old tree. Before updating, each Element node calls its corresponding Widget'scanUpdatemethod. If it returnstrue, the old Element is reused and updated with the new Widget's configuration data; otherwise, a new Element is created. TheWidget.canUpdatemethod primarily checks whether thenewWidgetandoldWidgethave the sameruntimeTypeandkey. If both are equal, it returnstrue; otherwise, it returnsfalse. Based on this principle, when we need to forcefully update a Widget, we can specify a different key to avoid reuse.When an ancestor Element decides to remove the Element (e.g., due to a change in the Widget tree structure that leads to the removal of the corresponding Widget), it calls the
deactivateChildmethod to remove it. After removal,element.renderObjectis also removed from the Render tree, and the framework callselement.deactivate, changing the Element's status to "inactive."An "inactive" Element will no longer be displayed on the screen. To prevent repeatedly creating and removing a specific Element during an animation, an "inactive" Element will be retained until the last frame of the current animation ends. If it does not return to "active" status after the animation ends, the framework calls its
unmountmethod to remove it completely, changing its status to "defunct," meaning it will never be inserted into the tree again.If an Element needs to be reinserted into a different location in the Element tree, such as when the Element or its ancestor has a
GlobalKey(for global reuse), the framework will first remove the Element from its current position, then call itsactivatemethod and reattach itsrenderObjectto the Render tree.
After reviewing the Element lifecycle, some readers may wonder whether developers directly manipulate the Element tree. In most cases, developers only need to focus on the Widget tree, as the Flutter framework maps operations on the Widget tree to the Element tree. This greatly reduces complexity and improves development efficiency. However, understanding Elements is crucial for grasping the entire Flutter UI framework, as Flutter links Widgets and RenderObjects through Elements. Understanding the Element layer will not only help readers gain a clear understanding of the Flutter UI framework but also enhance their abstraction and design skills. Additionally, there are times when we must directly use Element objects to perform certain operations, such as retrieving theme data, which will be detailed later.
2 BuildContext
We know that the build methods of StatelessWidget and StatefulWidget both pass a BuildContext object:
Widget build(BuildContext context) {}We also know that there are many occasions when we need to use this context for various tasks, such as:
Theme.of(context)// Get the themeNavigator.push(context, route)// Push a new routeLocalizations.of(context, type)// Get Localcontext.size// Get context sizecontext.findRenderObject()// Find the current or nearest ancestor RenderObject
So, what exactly is BuildContext? Upon examining its definition, we find it is an abstract interface class:
abstract class BuildContext {
    ...
}
But which implementation class corresponds to this context object? Following the trail, we discover that the build call occurs in the build methods of StatelessElement and StatefulElement corresponding to StatelessWidget and StatefulWidget. Taking StatelessElement as an example:
class StatelessElement extends ComponentElement {
  ...
  @override
  Widget build() => widget.build(this);
  ...
}
Here, we see that the parameter passed to build is this, making it clear that this BuildContext is the StatelessElement. Similarly, we find that the context for StatefulWidget is StatefulElement. However, neither StatelessElement nor StatefulElement directly implements the BuildContext interface. Continuing to trace the code, we find that they indirectly inherit from the Element class. Upon examining the Element class definition, we confirm that it indeed implements the BuildContext interface:
class Element extends DiagnosticableTree implements BuildContext {
    ...
}
Thus, the truth is revealed: BuildContext corresponds to the Element of the Widget, allowing us to directly access the Element object via context in the build methods of StatelessWidget and StatefulWidget. The code to retrieve theme data, Theme.of(context), internally calls the Element's dependOnInheritedWidgetOfExactType() method.
Reflection Question: Why is the parameter of the build method defined as a BuildContext rather than an Element object?
Advanced
We can see that the Element is the link between widgets and RenderObjects within the Flutter UI framework. Most of the time, developers only need to focus on the widget layer, but sometimes the widget layer cannot completely shield the details of Elements. Therefore, the framework passes the Element object to developers through the build method parameters in StatelessWidget and StatefulWidget, allowing developers to directly manipulate Element objects when needed. Now, I pose two questions:
If there were no widget layer, could a usable UI framework be built solely on the Element layer? If so, what would it look like?
Can the Flutter UI framework be non-responsive?
For question 1, the answer is definitely yes, as we previously mentioned that the widget tree is merely a mapping of the Element tree; we can indeed build a UI framework directly through Elements. Here’s an example:
We can simulate the functionality of a StatefulWidget purely with Elements. Suppose there is a page with a button displaying a 9-digit number. Clicking the button randomizes the order of the 9 digits. The code is as follows:
class HomeView extends ComponentElement {
  HomeView(Widget widget) : super(widget);
  String text = "123456789";

  @override
  Widget build() {
    Color primary = Theme.of(this).primaryColor; //1
    return GestureDetector(
      child: Center(
        child: TextButton(
          child: Text(text, style: TextStyle(color: primary)),
          onPressed: () {
            var t = text.split("")..shuffle();
            text = t.join();
            markNeedsBuild(); // Mark this Element as dirty, triggering a rebuild
          },
        ),
      ),
    );
  }
}
The build method above does not accept parameters, which differs from the build(BuildContext) method in StatelessWidget and StatefulWidget. Wherever BuildContext is needed in the code, we simply use this, such as in comment 1, where Theme.of(this) directly passes this, as the current object is already an instance of Element.
When text changes, we call markNeedsBuild() to mark the current Element as dirty. A dirty Element will be rebuilt in the next frame. In fact, State.setState() internally also calls markNeedsBuild().
The build method in the above code still returns a widget because the Flutter framework already has this widget layer, and the component library is provided in widget form. If all components in the Flutter framework were provided in Element form like the example HomeView, then UI could be constructed purely with Elements, allowing the return type of HomeView's build method to be Element.
If we want to run the above code within the existing Flutter framework, we still need to provide an "adapter" widget to integrate HomeView into the current framework. The following CustomHome acts as this "adapter":
class CustomHome extends Widget {
  @override
  Element createElement() {
    return HomeView(this);
  }
}
Now we can add CustomHome to the widget tree. We create it in a new route, and the final effect is shown in Figures (after clicking):
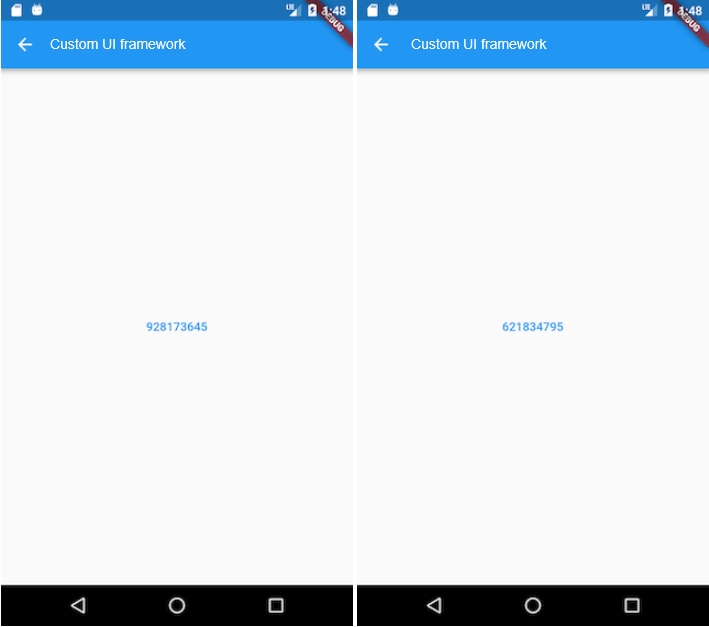
Clicking the button will randomly reorder the button text.
For question 2, the answer is also yes. The APIs provided by the Flutter engine are raw and independent, similar to those provided by operating systems. The design of the upper-level UI framework entirely depends on the designers, who can certainly create a UI framework in the style of Android or iOS. However, Google will not pursue this further, nor do we need to. This is because the concept of being responsive is excellent. The reason for raising this question is that I believe knowing whether it can be done is just as important as doing it, reflecting our level of understanding of the knowledge.
3 RenderObject
In the previous section, we mentioned that each Element corresponds to a RenderObject, which can be accessed via Element.renderObject. We also noted that the primary responsibilities of RenderObjects are layout and drawing, and all RenderObjects form a Render Tree. This section will focus on the role of RenderObject.
A RenderObject is an object in the Render Tree, primarily responsible for implementing event response and the execution processes in the rendering pipeline, excluding the build process (which is implemented by the Element). This includes layout, drawing, layer composition, and screen rendering, which we will discuss in later chapters.
RenderObject has a parent and a parentData property. The parent points to its parent node in the Render Tree, while parentData is a reserved variable that holds the layout information of all child components (e.g., position information, which is the offset relative to the parent component) during the parent's layout process. This layout information needs to be preserved during the layout phase because it will be used in the subsequent drawing phase (to determine the drawing position of the components). The primary role of the parentData attribute is to save layout information; for example, in a Stack layout, RenderStack stores the offset data of child elements in their parentData (see the implementation of Positioned for specifics).
The RenderObject class itself implements a basic layout and drawing protocol but does not define the child node model (e.g., how many children a node can have, whether there can be none, one, two, or more). It also does not define the coordinate system (e.g., whether child node positioning is in Cartesian or polar coordinates) or specific layout protocols (e.g., whether it uses width and height or constraints and size, or whether the parent node sets the child node’s size and position before or after laying out the child node).
To address this, the Flutter framework provides RenderBox and RenderSliver classes, both inheriting from RenderObject. The layout coordinate system uses Cartesian coordinates, with the screen’s (top, left) as the origin. Based on these two classes, Flutter implements box model layout based on RenderBox and on-demand loading models based on Sliver, which we have discussed in previous chapters.
4 Summary
This section provided a detailed introduction to the lifecycle of Elements, their relationship with Widgets and BuildContext, and finally introduced another important role in the Flutter UI framework: RenderObject. In the next section, we will focus on the layout process within the Flutter rendering pipeline.
