10.1 Introduction
In reactive programming frameworks, "state management" is an eternal topic. Whether it's in React/Vue (both are web development frameworks that support reactive programming) or Flutter, the problems discussed and the solutions are consistent. So, if you're familiar with state management in React/Vue, you can skip this section. Let's get back to the main topic: who should manage the state of a StatefulWidget? The Widget itself? Its parent Widget? Both? Or another object? The answer is: it depends! Here are the most common methods of managing state:
The Widget manages its own state.
The Widget's parent manages its state.
Mixed management (both parent and child Widgets manage the state).
How do you decide which method to use? Here are some official guidelines to help you decide:
If the state is user data, like the selected state of a checkbox or the position of a slider, it's best managed by the parent Widget.
If the state is related to the appearance of the UI, such as color or animations, it's best managed by the Widget itself.
If a state is shared among different Widgets, it's best managed by their common parent Widget.
Managing the state within a Widget offers better encapsulation, while managing it in the parent Widget provides more flexibility. Sometimes, if you're unsure about how to manage the state, it's recommended to manage it in the parent Widget (since flexibility is often more important).
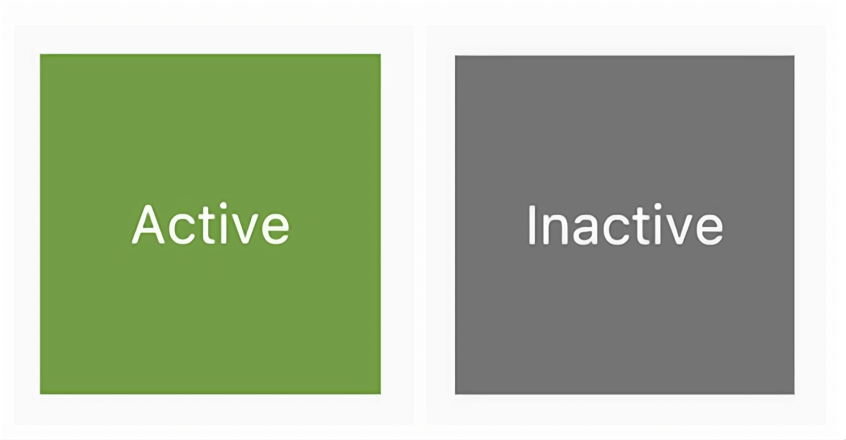
Next, we will explain the different methods of state management by creating three simple examples: TapboxA, TapboxB, and TapboxC. These examples have similar functionality—creating a box that changes its background color between green and gray when clicked. The state _active determines the color: green when true and gray when false, as shown in Figure:
In the following examples, we will use GestureDetector to detect tap events. We will cover the details of GestureDetector in the chapter on "Event Handling."
10.2 Widget Manages Its Own State
We will create TapboxA, where its corresponding class _TapboxAState:
Manages the state of
TapboxA.Defines
_active, a boolean value that determines the current color of the box.Defines a function
_handleTap(), which updates_activewhen the box is tapped and callssetState()to update the UI.Implements all interactive behavior of the widget.
// TapboxA manages its own state.

//------------------------- TapboxA ----------------------------------

class TapboxA extends StatefulWidget {
  TapboxA({Key? key}) : super(key: key);

  @override
  _TapboxAState createState() => _TapboxAState();
}

class _TapboxAState extends State<TapboxA> {
  bool _active = false;

  void _handleTap() {
    setState(() {
      _active = !_active;
    });
  }

  @override
  Widget build(BuildContext context) {
    return GestureDetector(
      onTap: _handleTap,
      child: Container(
        child: Center(
          child: Text(
            _active ? 'Active' : 'Inactive',
            style: TextStyle(fontSize: 32.0, color: Colors.white),
          ),
        ),
        width: 200.0,
        height: 200.0,
        decoration: BoxDecoration(
          color: _active ? Colors.lightGreen[700] : Colors.grey[600],
        ),
      ),
    );
  }
}
10.3 Parent Widget Manages the Child Widget's State
For the parent Widget, managing the state and telling its child Widget when to update is often a good practice. For example, IconButton is a stateless Widget because we assume the parent Widget should know if the button was pressed and respond accordingly.
In the following example, TapboxB passes its state to its parent through a callback, and the state is managed by the parent component, which is a StatefulWidget. Since TapboxB doesn't manage any state, it is a StatelessWidget.
ParentWidgetState class:
Manages the
_activestate forTapboxB.Implements
_handleTapboxChanged(), the method called when the box is tapped.Calls
setState()to update the UI when the state changes.
TapboxB class:
Extends
StatelessWidgetbecause all the state is managed by its parent.Notifies the parent when a tap is detected.
// ParentWidget manages the state for TapboxB.

//------------------------ ParentWidget --------------------------------

class ParentWidget extends StatefulWidget {
  @override
  _ParentWidgetState createState() => _ParentWidgetState();
}

class _ParentWidgetState extends State<ParentWidget> {
  bool _active = false;

  void _handleTapboxChanged(bool newValue) {
    setState(() {
      _active = newValue;
    });
  }

  @override
  Widget build(BuildContext context) {
    return Container(
      child: TapboxB(
        active: _active,
        onChanged: _handleTapboxChanged,
      ),
    );
  }
}

//------------------------- TapboxB ----------------------------------

class TapboxB extends StatelessWidget {
  TapboxB({Key? key, this.active: false, required this.onChanged})
      : super(key: key);

  final bool active;
  final ValueChanged<bool> onChanged;

  void _handleTap() {
    onChanged(!active);
  }

  @override
  Widget build(BuildContext context) {
    return GestureDetector(
      onTap: _handleTap,
      child: Container(
        child: Center(
          child: Text(
            active ? 'Active' : 'Inactive',
            style: TextStyle(fontSize: 32.0, color: Colors.white),
          ),
        ),
        width: 200.0,
        height: 200.0,
        decoration: BoxDecoration(
          color: active ? Colors.lightGreen[700] : Colors.grey[600],
        ),
      ),
    );
  }
}
10.4 Mixed State Management
In some cases, mixed management can be useful. In this scenario, the Widget manages some internal state, while the parent Widget manages other external states.
In the following TapboxC example, when the finger is pressed down, a dark green border appears around the box, and when the finger is lifted, the border disappears. After the tap is completed, the box's color changes. TapboxC exports its _active state to its parent, but manages its own _highlight state. This example has two state objects: _ParentWidgetStateC and _TapboxCState.
_ParentWidgetStateC class:
Manages the
_activestate.Implements
_handleTapboxChanged(), called when the box is tapped.Calls
setState()to update the UI when the box is tapped and the_activestate changes.
_TapboxCState object:
Manages the
_highlightstate.GestureDetectorlistens to all tap events. When the user taps down, it adds a highlight (dark green border); when the user releases, the highlight is removed.Updates the
_highlightstate when pressed down, lifted, or canceled, and callssetState()to update the UI.Passes the state change to the parent when the box is tapped.
//---------------------------- ParentWidget ----------------------------

class ParentWidgetC extends StatefulWidget {
  @override
  _ParentWidgetCState createState() => _ParentWidgetCState();
}

class _ParentWidgetCState extends State<ParentWidgetC> {
  bool _active = false;

  void _handleTapboxChanged(bool newValue) {
    setState(() {
      _active = newValue;
    });
  }

  @override
  Widget build(BuildContext context) {
    return Container(
      child: TapboxC(
        active: _active,
        onChanged: _handleTapboxChanged,
      ),
    );
  }
}

//----------------------------- TapboxC ------------------------------

class TapboxC extends StatefulWidget {
  TapboxC({Key? key, this.active: false, required this.onChanged})
      : super(key: key);

  final bool active;
  final ValueChanged<bool> onChanged;

  @override
  _TapboxCState createState() => _TapboxCState();
}

class _TapboxCState extends State<TapboxC> {
  bool _highlight = false;

  void _handleTapDown(TapDownDetails details) {
    setState(() {
      _highlight = true;
    });
  }

  void _handleTapUp(TapUpDetails details) {
    setState(() {
      _highlight = false;
    });
  }

  void _handleTapCancel() {
    setState(() {
      _highlight = false;
    });
  }

  void _handleTap() {
    widget.onChanged(!widget.active);
  }

  @override
  Widget build(BuildContext context) {
    // Add a green border when pressed down, and remove it when released
    return GestureDetector(
      onTapDown: _handleTapDown, // Handle press down
      onTapUp: _handleTapUp, // Handle release
      onTap: _handleTap,
      onTapCancel: _handleTapCancel,
      child: Container(
        child: Center(
          child: Text(
            widget.active ? 'Active' : 'Inactive',
            style: TextStyle(fontSize: 32.0, color: Colors.white),
          ),
        ),
        width: 200.0,
        height: 200.0,
        decoration: BoxDecoration(
          color: widget.active ? Colors.lightGreen[700] : Colors.grey[600],
          border: _highlight
              ? Border.all(
                  color: Colors.teal[700],
                  width: 10.0,
                )
              : null,
        ),
      ),
    );
  }
}
An alternative implementation could export the highlight state to the parent component while keeping the _active state as internal. However, if you're going to provide this TapBox to others, it may not make much sense. Developers usually care about whether the box is in an "Active" state and may not care how the highlight is managed. Therefore, TapBox should handle these details internally.
10.5 Global State Management
When an application requires syncing state across components (including across routes), the methods mentioned above become difficult to manage. For example, if we have a settings page where we can set the language of the application, we would expect that when the language state changes, all components relying on the app's language rebuild themselves. However, these components that rely on the app's language are not located with the settings page, making it difficult to manage this with the above methods. In such cases, the correct approach is to handle communication between distant components using a global state manager. Currently, there are two main methods:
Implement a global event bus that maps the language state change to an event. Then, in the
initStatemethod of components that rely on the app's language, subscribe to this language change event. When the user switches languages in the settings page, we trigger the language change event, and subscribed components will receive the notification. After receiving the notification, they can callsetState(...)to rebuild themselves.Use some state management packages, such as
ProviderorRedux. You can check out their detailed information on pub.
