11.1 A Simple Example
In mobile development, a "Route" generally refers to a "Page." This concept is similar to the idea of a Route in single-page applications (SPA) in web development. In Android, a Route typically refers to an Activity, and in iOS, it refers to a ViewController. Route management involves controlling how pages navigate between each other and is often referred to as navigation management. Flutter's route management is similar to native development. Both Android and iOS maintain a stack of routes: pushing a route onto the stack corresponds to opening a new page, while popping a route from the stack corresponds to closing a page. Route management is primarily about managing the route stack.
Let's extend the counter example from section 2.1 with the following modifications:
Create a new route called "NewRoute."
class NewRoute extends StatelessWidget {
  @override
  Widget build(BuildContext context) {
    return Scaffold(
      appBar: AppBar(
        title: Text("New route"),
      ),
      body: Center(
        child: Text("This is a new route"),
      ),
    );
  }
}
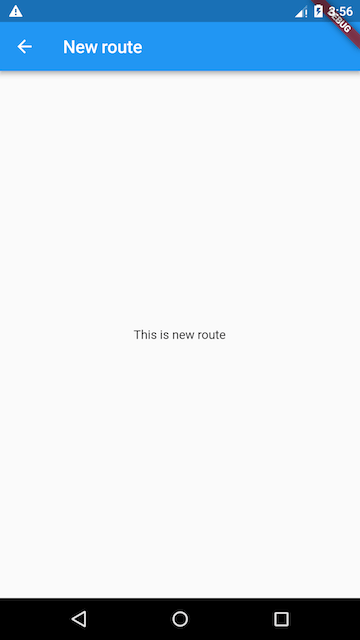
The new route is a simple page that inherits from StatelessWidget, displaying a "This is a new route" message in the center of the screen.
Next, add a button (TextButton) to the Column widget in the _MyHomePageState.build method:
Column(
  mainAxisAlignment: MainAxisAlignment.center,
  children: <Widget>[
    // ... (irrelevant code omitted)
    TextButton(
      child: Text("open new route"),
      onPressed: () {
        // Navigate to the new route
        Navigator.push(
          context,
          MaterialPageRoute(builder: (context) {
            return NewRoute();
          }),
        );
      },
    ),
  ],
)
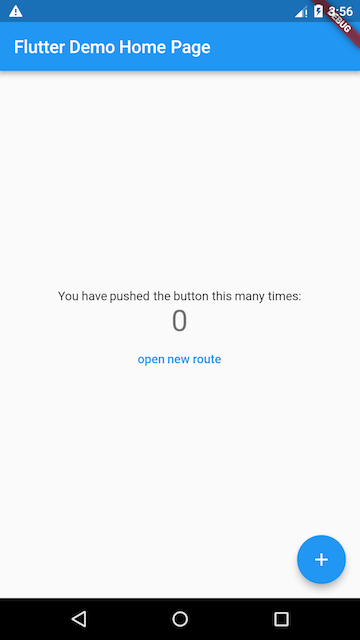
We have added a button that, when clicked, opens a new route. The result is shown in Figures.
11.2 MaterialPageRoute
MaterialPageRoute inherits from the PageRoute class, which is an abstract class that represents a modal route page occupying the entire screen. It also defines interfaces and properties for route building and transition animations. MaterialPageRoute is part of the Material components library and provides platform-specific route transition animations to match the native behavior:
-
Android: When opening a new page, the page slides in from the bottom of the screen to the top. When closing the page, the current page slides out from the top to the bottom.
-
iOS: When opening a new page, the page slides in from the right edge of the screen to the left. When closing the page, the current page slides out to the right, while the previous page slides in from the left.
Here is the constructor for MaterialPageRoute and the meaning of its parameters:
MaterialPageRoute({
  WidgetBuilder builder,
  RouteSettings settings,
  bool maintainState = true,
  bool fullscreenDialog = false,
})
-
builder: A
WidgetBuildercallback that builds the content of the route. Typically, this is used to return the new route's instance. -
settings: Contains the route’s configuration, such as the route name and whether it's the initial route (home page).
-
maintainState: By default, the previous route remains in memory when a new route is pushed. If you want to release all resources when the route is no longer in use, set this to
false. -
fullscreenDialog: Whether the new route is a full-screen modal dialog. On iOS, if this is
true, the new page will slide in from the bottom of the screen instead of from the side.
If you want to customize the route transition animations, you can extend the PageRoute class. We will demonstrate this when we cover animations in a later section.
11.3 Navigator
Navigator is the widget responsible for managing routes. It provides methods to open and close route pages. The Navigator maintains a stack of active routes, with the currently visible page being the top route in the stack. The Navigator class provides several methods for managing the route stack, but we will focus on the two most commonly used methods:
-
Future push(BuildContext context, Route route)
Pushes the given route onto the stack (i.e., opens a new page). The return value is aFuturethat receives data when the new route is popped (i.e., closed). -
bool pop(BuildContext context, [result])
Pops the top route off the stack. Theresultis the data returned to the previous page when the current page is closed.
Navigator also provides other methods like Navigator.replace and Navigator.popUntil. For more details, refer to the API documentation or SDK source code. Another concept we need to introduce is "named routes," which we will cover next.
11.4 Passing Arguments Between Routes
Often, when navigating between routes, we need to pass some data. For instance, when opening a product details page, we need to pass a product ID so that the page knows which product to display. Similarly, when filling out an order, we might want to select a shipping address, and the selected address should be returned to the order page. Let's demonstrate how to pass arguments between routes using a simple example.
We will create a TipRoute that accepts a text parameter and displays it on the page. Additionally, there will be a "Return" button that, when clicked, returns a value to the previous route. Here’s the implementation:
TipRoute Implementation:
class TipRoute extends StatelessWidget {
  TipRoute({
    Key? key,
    required this.text,  // Receives a text parameter
  }) : super(key: key);

  final String text;

  @override
  Widget build(BuildContext context) {
    return Scaffold(
      appBar: AppBar(
        title: Text("Tip"),
      ),
      body: Padding(
        padding: EdgeInsets.all(18),
        child: Center(
          child: Column(
            children: <Widget>[
              Text(text),
              ElevatedButton(
                onPressed: () => Navigator.pop(context, "Return value"),
                child: Text("Return"),
              )
            ],
          ),
        ),
      ),
    );
  }
}
Code for Opening the New Route TipRoute:
class RouterTestRoute extends StatelessWidget {
  @override
  Widget build(BuildContext context) {
    return Center(
      child: ElevatedButton(
        onPressed: () async {
          // Open `TipRoute` and wait for the result
          var result = await Navigator.push(
            context,
            MaterialPageRoute(
              builder: (context) {
                return TipRoute(
                  // Route argument
                  text: "This is a tip",
                );
              },
            ),
          );
          // Print the return value from `TipRoute`
          print("Return value from route: $result");
        },
        child: Text("Open Tip Page"),
      ),
    );
  }
}
Running this code, clicking the "Open Tip Page" button in the RouterTestRoute will open the TipRoute page. The result is shown in Figure.

Explanation:
-
The message "This is a tip" is passed to the new route via the
textparameter ofTipRoute. -
We can use the
Futurereturned byNavigator.push(...)to get the return data from the new route.
In the TipRoute page, there are two ways to return to the previous page:
-
Clicking the back arrow in the navigation bar.
-
Clicking the "Return" button on the page.
The difference between these two return methods is that the former does not return any data to the previous route, while the latter does. Below is the output of the print method in the RouterTestRoute page after clicking the return button and the back arrow:
I/flutter (27896): Return value from route: Return value
I/flutter (27896): Return value from route: null
The method above describes how to pass arguments with non-named routes. Passing arguments using named routes will differ slightly, and we will cover that when we discuss named routes later.
11.5 Named Routes
"Named Routes" refer to routes that have a name, which allows us to directly open new routes using their names. This provides a more intuitive and simple way to manage routes.
1. Routing Table
To use named routes, we first need to provide and register a routing table so the application knows which name corresponds to which route component. Registering a routing table is essentially giving names to routes. The definition of a routing table is as follows:
Map<String, WidgetBuilder> routes;
It is a Map where the key is the name of the route (a string), and the value is a WidgetBuilder callback used to generate the corresponding route widget. When we open a new route by its name, the app will look up the name in the routing table to find the corresponding WidgetBuilder callback, call it to generate the route widget, and return it.
2. Registering the Routing Table
Registering the routing table is simple. We go back to the previous "Counter" example, find the MaterialApp in the MyApp class's build method, and add the routes property, as shown below:
MaterialApp(
  title: 'Flutter Demo',
  theme: ThemeData(
    primarySwatch: Colors.blue,
  ),
  // Register the routing table
  routes:{
    "new_page": (context) => NewRoute(),
    // Other route registration omitted
  },
  home: MyHomePage(title: 'Flutter Demo Home Page'),
);
Now we have completed the registration of the routing table. In the above code, the home route is not using a named route. If we want to register home as a named route, how should we do it? It's simple, just look at the code:
MaterialApp(
  title: 'Flutter Demo',
  initialRoute: "/", // The route named "/" is the home (main page) of the app
  theme: ThemeData(
    primarySwatch: Colors.blue,
  ),
  // Register the routing table
  routes:{
    "new_page": (context) => NewRoute(),
    "/": (context) => MyHomePage(title: 'Flutter Demo Home Page'), // Register the home route
  }
);
You can see that we just need to register the MyHomePage route in the routing table and set its name as the value of the initialRoute property of MaterialApp. This property determines which named route will be the initial route page of the app.
3. Opening a New Route Using the Route Name
To open a new route using its name, you can use the Navigator's pushNamed method:
Future pushNamed(BuildContext context, String routeName, {Object arguments});
Besides the pushNamed method, Navigator also has other methods to manage named routes, such as pushReplacementNamed. You can refer to the API documentation for more information. Now, let's modify the onPressed callback code of the TextButton to open a new route using the route name:
onPressed: () {
  Navigator.pushNamed(context, "new_page");
  // Navigator.push(context,
  //   MaterialPageRoute(builder: (context) {
  //   return NewRoute();
  // }));
},
Hot reload the app, and when you click the "open new route" button again, it will still open the new route page.
4. Passing Parameters in Named Routes
In the early versions of Flutter, named routes did not support passing parameters, but later it was added. Here's how to pass and retrieve route parameters with named routes:
First, register a route:
routes:{
  "new_page": (context) => EchoRoute(),
},
Then, in the route page, retrieve the parameters using the RouteSettings object:
class EchoRoute extends StatelessWidget {

  @override
  Widget build(BuildContext context) {
    // Get the route parameters
    var args = ModalRoute.of(context).settings.arguments;
    // Omitted code...
  }
}
Finally, pass parameters when opening the route:
Navigator.of(context).pushNamed("new_page", arguments: "hi");
5. Adapting for Parameterized Routes
Suppose we want to register the TipRoute from the earlier example in the routing table so that it can be opened using a route name. However, since TipRoute takes a text parameter, how can we adapt this without changing the source code of TipRoute? It's simple:
MaterialApp(
  // Omitted code...
  routes: {
    "tip2": (context) {
      return TipRoute(text: ModalRoute.of(context)!.settings.arguments);
    },
  },
);
11.6 Route Generation Hooks
Imagine developing an e-commerce app where users can view store and product information without logging in, but they must log in to see order history, cart, and personal information pages. To implement this, we need to check the user's login status before opening each route page. Doing this for every route would be tedious. Is there a better solution? Yes!
MaterialApp has an onGenerateRoute property that can be invoked when opening a named route. The reason it's "can be" invoked is that when Navigator.pushNamed(...) is called to open a named route, if the specified route name is registered in the routing table, the builder function in the routing table will be called to generate the route component. If the route is not registered, onGenerateRoute will be invoked to generate the route. The signature of the onGenerateRoute callback is as follows:
Route<dynamic> Function(RouteSettings settings);
With the onGenerateRoute callback, implementing permission control as described above becomes very easy. We abandon using the routing table and instead provide an onGenerateRoute callback. In this callback, we can perform unified permission control, as shown:
MaterialApp(
  // Omitted code...
  onGenerateRoute: (RouteSettings settings) {
    return MaterialPageRoute(builder: (context) {
      String routeName = settings.name;
      // If the route page requires login but the user is not logged in,
      // return the login page route, guiding the user to log in.
      // Otherwise, open the route normally.
    });
  },
);
Note that onGenerateRoute only applies to named routes.
11.7 Summary
In this chapter, we introduced routing management and parameter passing in Flutter, with a focus on named routes. It's important to note that named routes are an optional routing management approach. In actual development, you might wonder which routing management method to use. Based on experience, I recommend using named routes, as they offer the following benefits:
-
Clearer semantics.
-
Easier code maintenance. If using anonymous routes, you must create the new route page where
Navigator.pushis called, which requires importing the new route page's Dart file. This makes the code more scattered. -
Global pre-route handling logic can be implemented via
onGenerateRoute.
Therefore, I suggest using named routes, although it's not a hard rule. You can decide based on your preference or the specific requirements of your project.
Additionally, there are some other routing management features we haven't covered, such as the navigatorObservers and onUnknownRoute properties in MaterialApp. The former allows you to monitor all route transitions, while the latter is invoked when trying to open a non-existent named route. These features are not commonly used and relatively simple, so we won't spend more time introducing them. You can explore them in the API documentation on your own.

