66.1 Introduction
Sometimes, we may need complex animations that consist of a sequence of animations or overlapping animations. For example, consider a bar chart where the height increases while changing color, and once it reaches its maximum height, we need to translate it a certain distance along the X-axis. This scenario includes various animations at different stages. To achieve this effect, using Staggered Animation is very simple. Here are a few key points to note about staggered animations:
To create a staggered animation, multiple animation objects (Animation) are needed.
A single AnimationController controls all the animation objects.
Each animation object is assigned a time interval (Interval).
All animations are driven by the same AnimationController. Regardless of how long the animation lasts, the controller’s value must be between 0.0 and 1.0, and each animation’s interval must also be between 0.0 and 1.0. For each property set in the interval, a Tween must be created to specify the start and end values for that property. In other words, 0.0 to 1.0 represents the entire animation process, and we can specify different starting and ending points for different animations to determine their start and end times.
66.2 Example
Now, let’s look at an example to implement an animation of a bar chart growing:
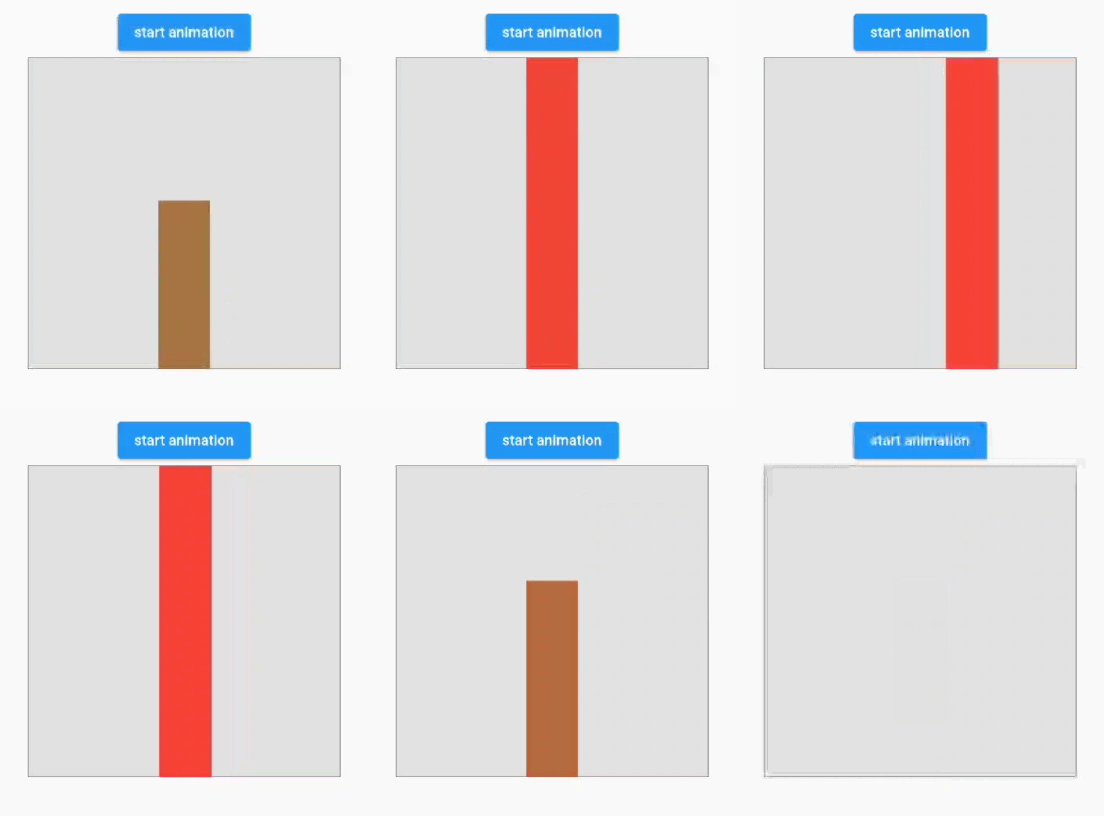
Initially, the height increases from 0 to 300 pixels, while the color transitions from green to red; this process occupies 60% of the total animation time.
Once the height reaches 300, it starts translating 100 pixels to the right along the X-axis; this process takes up the remaining 40% of the total animation time.
We separate the widget that performs the animation:
class StaggerAnimation extends StatelessWidget {
  StaggerAnimation({
    Key? key,
    required this.controller,
  }) : super(key: key) {
    // Height animation
    height = Tween<double>(
      begin: .0,
      end: 300.0,
    ).animate(
      CurvedAnimation(
        parent: controller,
        curve: const Interval(
          0.0, 0.6, // Interval for the first 60% of the animation time
          curve: Curves.ease,
        ),
      ),
    );

    color = ColorTween(
      begin: Colors.green,
      end: Colors.red,
    ).animate(
      CurvedAnimation(
        parent: controller,
        curve: const Interval(
          0.0, 0.6, // Interval for the first 60% of the animation time
          curve: Curves.ease,
        ),
      ),
    );

    padding = Tween<EdgeInsets>(
      begin: const EdgeInsets.only(left: .0),
      end: const EdgeInsets.only(left: 100.0),
    ).animate(
      CurvedAnimation(
        parent: controller,
        curve: const Interval(
          0.6, 1.0, // Interval for the last 40% of the animation time
          curve: Curves.ease,
        ),
      ),
    );
  }

  late final Animation<double> controller;
  late final Animation<double> height;
  late final Animation<EdgeInsets> padding;
  late final Animation<Color?> color;

  Widget _buildAnimation(BuildContext context, child) {
    return Container(
      alignment: Alignment.bottomCenter,
      padding: padding.value,
      child: Container(
        color: color.value,
        width: 50.0,
        height: height.value,
      ),
    );
  }

  @override
  Widget build(BuildContext context) {
    return AnimatedBuilder(
      builder: _buildAnimation,
      animation: controller,
    );
  }
}
In StaggerAnimation, three animations are defined for the Container's height, color, and padding properties, and each animation is assigned a starting and ending point in the animation process using Interval. Now, let’s implement the route that starts the animation:
class StaggerRoute extends StatefulWidget {
  @override
  _StaggerRouteState createState() => _StaggerRouteState();
}

class _StaggerRouteState extends State<StaggerRoute>
    with TickerProviderStateMixin {
  late AnimationController _controller;

  @override
  void initState() {
    super.initState();

    _controller = AnimationController(
      duration: const Duration(milliseconds: 2000),
      vsync: this,
    );
  }

  _playAnimation() async {
    try {
      // First, play the animation forward
      await _controller.forward().orCancel;
      // Then, play the animation in reverse
      await _controller.reverse().orCancel;
    } on TickerCanceled {
      // Capture exceptions that may occur when the widget is destroyed and the ticker is canceled.
    }
  }

  @override
  Widget build(BuildContext context) {
    return Center(
      child: Column(
        children: [
          ElevatedButton(
            onPressed: () => _playAnimation(),
            child: Text("Start Animation"),
          ),
          Container(
            width: 300.0,
            height: 300.0,
            decoration: BoxDecoration(
              color: Colors.black.withOpacity(0.1),
              border: Border.all(
                color: Colors.black.withOpacity(0.5),
              ),
            ),
            // Call our defined staggered animation widget
            child: StaggerAnimation(controller: _controller),
          ),
        ],
      ),
    );
  }
}
The execution effect is shown in Figure.
