65.1 Implementing Custom Hero Animation
For example, we have a profile picture component that initially displays a small circular image. We want to implement a feature that allows users to click and view a larger version of the image. To enhance the experience, we will execute a “flying” transition animation when transitioning from the small to the large image and vice versa, as illustrated in Figure 9-2:
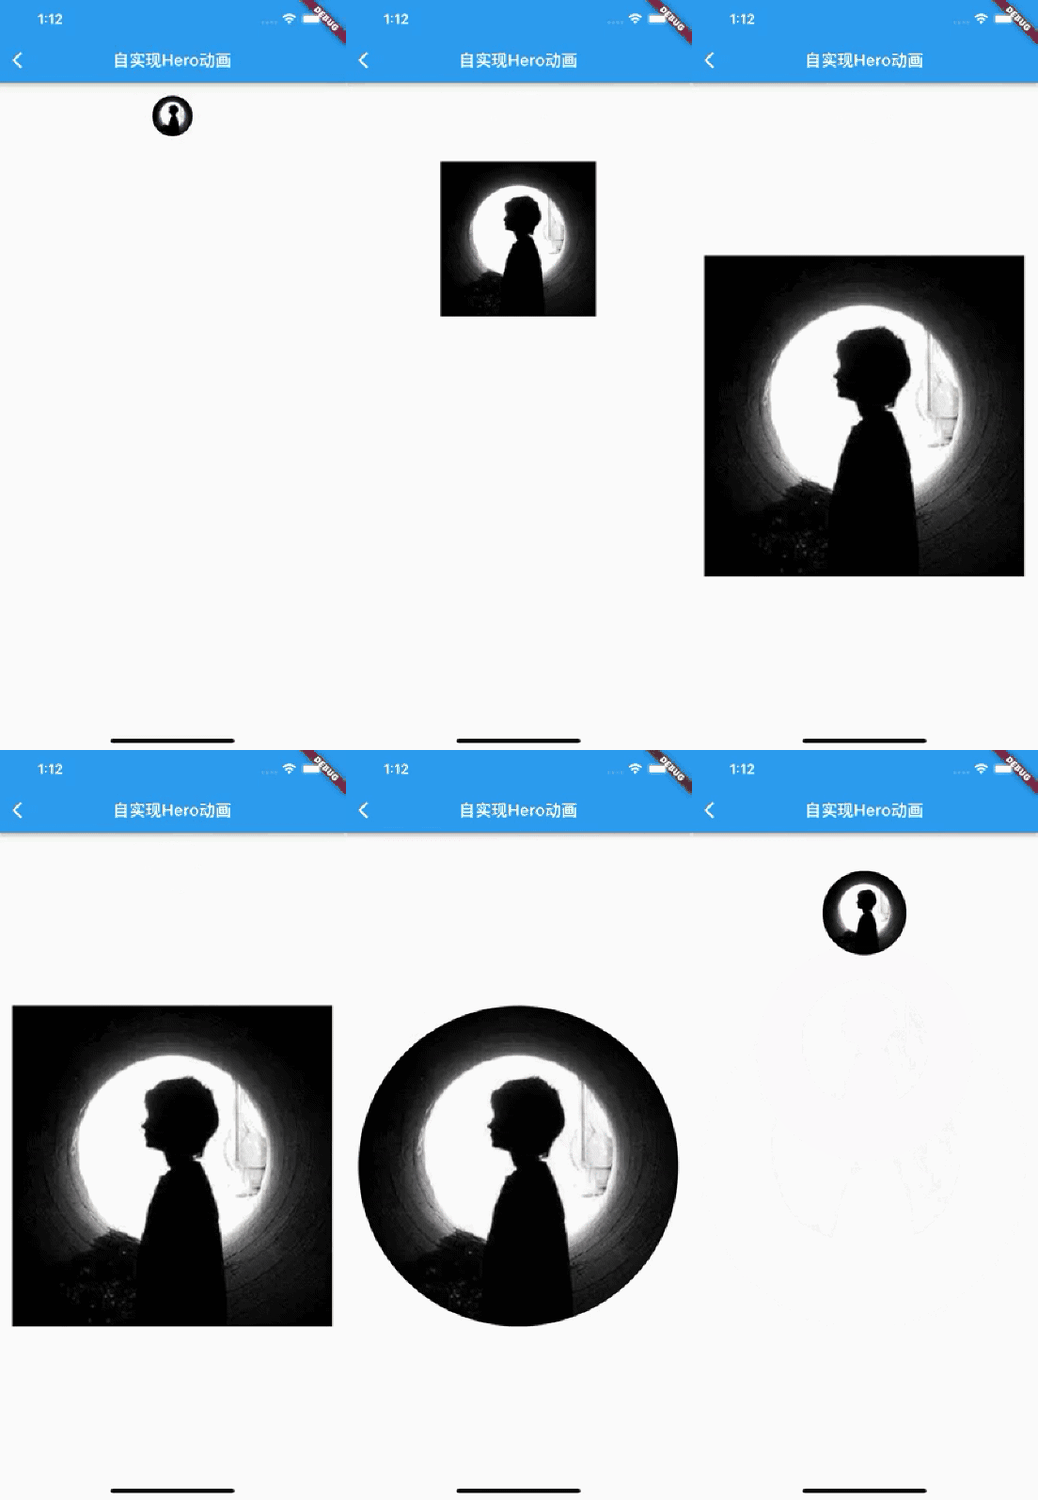
To achieve the animation effect described above, the simplest way is to use Flutter's Hero animation. However, to help readers understand the principles behind Hero animations, I will first implement this effect using the knowledge from previous chapters.
After a simple analysis, we have a plan: first, we need to determine the positions and sizes of the small and large images. We will use a Stack for the animation and set the position and size of each frame with Positioned. Here’s how we can implement it:
class CustomHeroAnimation extends StatefulWidget {
  const CustomHeroAnimation({Key? key}) : super(key: key);

  @override
  _CustomHeroAnimationState createState() => _CustomHeroAnimationState();
}

class _CustomHeroAnimationState extends State<CustomHeroAnimation>
    with SingleTickerProviderStateMixin {
  late AnimationController _controller;
  bool _animating = false;
  AnimationStatus? _lastAnimationStatus;
  late Animation _animation;

  // Areas occupied by the two components in the Stack
  Rect? child1Rect;
  Rect? child2Rect;

  @override
  void initState() {
    _controller = AnimationController(vsync: this, duration: Duration(milliseconds: 200));
    // Apply curve
    _animation = CurvedAnimation(
      parent: _controller,
      curve: Curves.easeIn,
    );

    _controller.addListener(() {
      if (_controller.isCompleted || _controller.isDismissed) {
        if (_animating) {
          setState(() {
            _animating = false;
          });
        }
      } else {
        _lastAnimationStatus = _controller.status;
      }
    });
    super.initState();
  }

  @override
  void dispose() {
    _controller.dispose();
    super.dispose();
  }

  @override
  Widget build(BuildContext context) {
    // Small avatar
    final Widget child1 = wChild1();
    // Large avatar
    final Widget child2 = wChild2();

    // Whether to show the small avatar; should only be displayed during animation, initial state, or just after transitioning from large to small
    bool showChild1 = !_animating && _lastAnimationStatus != AnimationStatus.forward;

    // Target component during the animation; if transitioning from small to large, the target is the large image; otherwise, it's the small image
    Widget targetWidget;
    if (showChild1 || _controller.status == AnimationStatus.reverse) {
      targetWidget = child1;
    } else {
      targetWidget = child2;
    }

    return LayoutBuilder(builder: (context, constraints) {
      return SizedBox(
        // Fill the remaining screen space with the Stack
        width: constraints.maxWidth,
        height: constraints.maxHeight,
        child: Stack(
          alignment: AlignmentDirectional.topCenter,
          children: [
            if (showChild1)
              AfterLayout(
                // Get the Rect information for the small image in the Stack
                callback: (value) => child1Rect = _getRect(value),
                child: child1,
              ),
            if (!showChild1)
              AnimatedBuilder(
                animation: _animation,
                builder: (context, child) {
                  // Interpolate the rect
                  final rect = Rect.lerp(
                    child1Rect,
                    child2Rect,
                    _animation.value,
                  );
                  // Use Positioned to set component size and position
                  return Positioned.fromRect(rect: rect!, child: child!);
                },
                child: targetWidget,
              ),
            // Used to measure the size of child2, set to fully transparent and unresponsive
            IgnorePointer(
              child: Center(
                child: Opacity(
                  opacity: 0,
                  child: AfterLayout(
                    // Get the Rect information for the large image in the Stack
                    callback: (value) => child2Rect = _getRect(value),
                    child: child2,
                  ),
                ),
              ),
            ),
          ],
        ),
      );
    });
  }

  Widget wChild1() {
    // Execute forward animation on tap
    return GestureDetector(
      onTap: () {
        setState(() {
          _animating = true;
          _controller.forward();
        });
      },
      child: SizedBox(
        width: 50,
        child: ClipOval(child: Image.asset("imgs/avatar.png")),
      ),
    );
  }

  Widget wChild2() {
    // Execute reverse animation on tap
    return GestureDetector(
      onTap: () {
        setState(() {
          _animating = true;
          _controller.reverse();
        });
      },
      child: Image.asset("imgs/avatar.png", width: 400),
    );
  }

  Rect _getRect(RenderAfterLayout renderAfterLayout) {
    // We need to get the AfterLayout child component's Rect relative to the Stack
    return renderAfterLayout.localToGlobal(
          Offset.zero,
          // Find the corresponding RenderObject for the Stack
          ancestor: context.findRenderObject(),
        ) &
        renderAfterLayout.size;
  }
}
After running this code, clicking on the avatar will trigger the animation effect shown above.
As can be seen, implementing the entire flying animation is quite complex. However, since this type of animation is frequently used in interactions, Flutter abstracts the logic for implementing flying animations at the framework level, providing a general and simple way to create Hero animations.
65.2 Flutter Hero Animation
A Hero refers to a widget that can "fly" between routes (pages). In simple terms, a Hero animation occurs when there is a shared widget that transitions between the new and old routes during route changes. Since the shared widget may have different positions and appearances on the new and old route pages, it gradually transitions from the old route to the specified position in the new route, creating a Hero animation.
You may have seen Hero animations multiple times. For example, a route displaying a list of thumbnails for products may allow a user to tap an item and navigate to a new route that contains detailed information and a "Purchase" button. In Flutter, moving an image from one route to another is referred to as a Hero animation, although similar actions are sometimes called shared element transitions. Let's experience a Hero animation through an example.
Why are these flying shared components called heroes? One explanation is rooted in American culture, where Superman is seen as a flying hero. Additionally, many superheroes in Marvel also fly, so Flutter developers have given this "flying widget" a romantic name: hero. Although this explanation is not official, it is interesting.
Example
Suppose there are two routes, A and B, with the following interactions:
A: Contains a user avatar displayed as a circle; clicking it navigates to route B, where the large image can be viewed.
B: Displays the original user avatar image in a rectangle.
When transitioning between routes A and B, the user avatar will gradually transition to the target avatar on the new route page. Let’s first take a look at the code and then explain it.
Route A:
class HeroAnimationRouteA extends StatelessWidget {
  const HeroAnimationRouteA({Key? key}) : super(key: key);

  @override
  Widget build(BuildContext context) {
    return Container(
      alignment: Alignment.topCenter,
      child: Column(
        children: <Widget>[
          InkWell(
            child: Hero(
              tag: "avatar", // Unique tag; must be the same in both routes
              child: ClipOval(
                child: Image.asset(
                  "imgs/avatar.png",
                  width: 50.0,
                ),
              ),
            ),
            onTap: () {
              // Open route B
              Navigator.push(context, PageRouteBuilder(
                pageBuilder: (
                  BuildContext context,
                  animation,
                  secondaryAnimation,
                ) {
                  return FadeTransition(
                    opacity: animation,
                    child: Scaffold(
                      appBar: AppBar(
                        title: const Text("Original Image"),
                      ),
                      body: const HeroAnimationRouteB(),
                    ),
                  );
                },
              ));
            },
          ),
          const Padding(
            padding: EdgeInsets.only(top: 8.0),
            child: Text("Click the avatar"),
          )
        ],
      ),
    );
  }
}
Route B:
class HeroAnimationRouteB extends StatelessWidget {
  @override
  Widget build(BuildContext context) {
    return Center(
      child: Hero(
        tag: "avatar", // Unique tag; must be the same in both routes
        child: Image.asset("imgs/avatar.png"),
      ),
    );
  }
}
As seen, implementing a Hero animation requires simply wrapping the shared widget with the Hero component and providing the same tag. Flutter automatically completes the transition frames in between. It’s crucial to ensure that the shared Hero's tag is identical in both routes, as Flutter uses this tag to determine the correspondence between the widgets in the old and new routes.
The principle of Hero animations is quite simple. The Flutter framework knows the positions and sizes of the shared elements in the old and new routes, allowing it to calculate the interpolated values (intermediate states) during the animation based on these two endpoints. Fortunately, we don’t need to handle these calculations ourselves, as Flutter has already done that for us. In fact, the implementation principles of Flutter's Hero animations are similar to those we discussed at the beginning of this chapter for custom implementations. Interested readers can check the source code related to Hero animations.
