The drawing-related implementations are found in the rendering object RenderObject. The main properties related to drawing within RenderObject include:
layerisRepaintBoundary(type: bool)needsCompositing(type: bool, introduced in later sections)
To facilitate description, let's define the concept of a "repaint boundary node":
We refer to RenderObject nodes with the isRepaintBoundary property set to true as repaint boundary nodes (in this section, we can omit the word "repaint," so "boundary node" refers specifically to repaint boundary nodes).
1 RepaintBoundary
Flutter provides a RepaintBoundary component, which essentially inserts a repaint boundary node into the component tree.
2 Component Tree Drawing Process
Now, let's discuss the general process for Flutter's component tree drawing. Note that this is not a complete process, as we will temporarily ignore situations that require "layer compositing," which will be covered later. Here’s the basic flow:
During Flutter's first draw, it recursively starts drawing child nodes from top to bottom. When it encounters a boundary node, it checks if the boundary node's layer property is empty (type: ContainerLayer). If it is, a new OffsetLayer is created and assigned to it; if not, the existing layer is used. The boundary node's layer is then passed to its child nodes, leading to two possible scenarios:
If the child node is not a boundary node and needs to be drawn, during the first drawing:
A
Canvasobject and aPictureLayerare created, and they are bound together. Subsequent drawing calls will draw onto the boundPictureLayer.This
PictureLayeris then added to the boundary node's layer.If it's not the first draw, the existing
PictureLayerandCanvasobjects are reused.If the child node is a boundary node, the above process is recursively applied to the child nodes. Once the subtree recursion completes, the child node's layer is added to its parent layer.
After this entire process, a layer tree is generated. Let's understand the whole process through an example: in Figure , the left side shows the widget tree, and the right side shows the generated layer tree. Let’s examine the generation process:
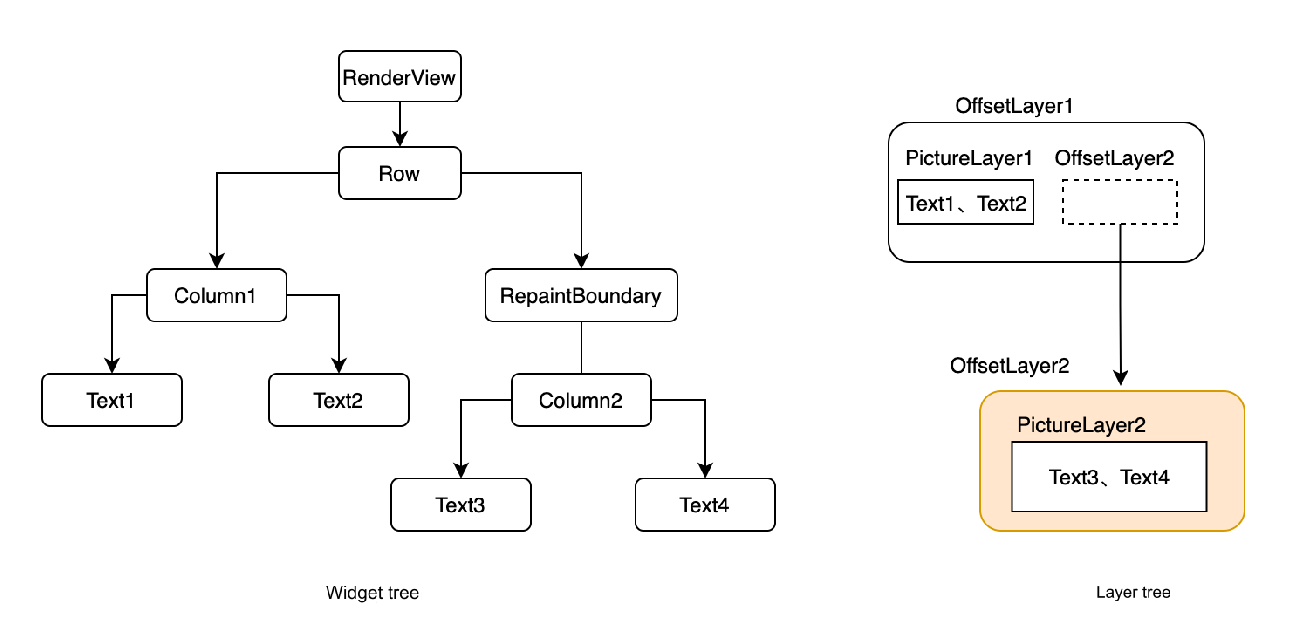
In Figure , RenderView is the root node of the Flutter application, and drawing begins from it since it is a repaint boundary node. During the first draw, an OffsetLayer (let's call it OffsetLayer1) is created for it, which is then passed to Row.
Since Row is a container component and does not need to draw itself, it will draw its children instead. It has two children; first, it draws Column1, passing OffsetLayer1 to it. Column1 also does not need to draw itself, so it passes OffsetLayer1 to its first child, Text1.
Text1 needs to draw text, so it uses OffsetLayer1. Since it’s the first draw, it creates a new PictureLayer1 and a Canvas1, binding them together. Then, the text content is drawn using the Canvas1 object. Once Text1 is drawn, Column1 passes OffsetLayer1 to Text2.
Text2 also needs to use OffsetLayer1 for text drawing, but since it is not the first draw, it reuses the previous Canvas1 and PictureLayer1 to draw the text. After drawing Column1's children, PictureLayer1 contains the draw results of both Text1 and Text2.
Next, after Row completes drawing Column1, it starts drawing its second child, RepaintBoundary. Row passes OffsetLayer1 to RepaintBoundary. Since it is a repaint boundary node and it’s the first draw, a new OffsetLayer2 is created for it. RepaintBoundary then passes OffsetLayer2 to Column2. Unlike Column1, Column2 will use OffsetLayer2 to draw Text3 and Text4, following the same drawing process as Column1, which will not be elaborated here.
Once RepaintBoundary's children are drawn, RepaintBoundary's layer (OffsetLayer2) is added to the parent layer (OffsetLayer1).
At this point, the entire component tree is drawn, resulting in the layer tree shown on the right side of the figure. It is important to note that PictureLayer1 and OffsetLayer2 are siblings, both being children of OffsetLayer1. From the example, we can see that the same layer can be shared among multiple components; for instance, Text1 and Text2 share PictureLayer1.
However, if they share layers, could it lead to an issue where, for example, if Text1 changes and needs to be redrawn, Text2 must also be redrawn?
The answer is: yes! This seems somewhat unreasonable. So why share layers at all? Can’t each component be drawn on a separate layer to avoid interference? The reason is to conserve resources; having too many layers can be resource-intensive for Skia, so this is actually a trade-off.
To emphasize, the above description is just the general drawing process. Typically, the number and structure of ContainerLayer and PictureLayer in the layer tree correspond one-to-one with repaint boundary nodes in the widget tree, not with every widget. Of course, if child components in the widget tree add new layers during the drawing process, the layer count will exceed that of the boundary nodes, resulting in a non-one-to-one correspondence. We will discuss how layers are used in child components in the next section. Additionally, it is worth mentioning that many components in Flutter that implement transformations, clipping, transparency, and other effects will add new layers to the layer tree, which will be explained in later sections regarding flushCompositingBits.
3 Initiating a Repaint
RenderObject initiates a repaint request by calling markNeedsRepaint. Before introducing what markNeedsRepaint does specifically, let’s guess what it should do based on the Flutter drawing process outlined above.
We know that there is layer sharing during the drawing process, so when repainting, all components sharing the same layer need to be redrawn. For instance, in the example above, if Text1 changes, we need to repaint not just Text1 but also Text2; if Text3changes,Text4` must also be repainted. How can this be achieved?
Since Text1 and Text2 share OffsetLayer1, who is the owner of OffsetLayer1? If we can find it, we can trigger a repaint! It can be easily identified that OffsetLayer1’s owner is the root node RenderView, which is also the first parent repaint boundary node for both Text1 and Text2. Similarly, OffsetLayer2 is the first parent repaint boundary node for Text3 and Text4. Thus, we can conclude that when a node needs to be repainted, we need to find the nearest first parent repaint boundary node and trigger a repaint for it. The markNeedsRepaint function accomplishes this process. When a node calls it, the specific steps are as follows:
It will search up through the parent nodes until it finds a repaint boundary node, at which point the search terminates. This repaint boundary node is then added to its
PipelineOwner’s_nodesNeedingPaintlist (which stores the repaint boundary nodes that need to be redrawn).During the search, it will set the
_needsPaintattribute of all nodes along the path to the repaint boundary node to true, indicating that they need to be redrawn.It requests a new frame, initiating the repaint process.
The core source code for the reduced markNeedsRepaint is as follows:
void markNeedsPaint() {
  if (_needsPaint) return;
  _needsPaint = true;
  if (isRepaintBoundary) { // If the current node is a boundary node
      owner!._nodesNeedingPaint.add(this); // Add the current node to the repaint list
      owner!.requestVisualUpdate(); // Request a new frame; this eventually calls scheduleFrame()
  } else if (parent is RenderObject) { // If it’s not a boundary node and has a parent
    final RenderObject parent = this.parent! as RenderObject;
    parent.markNeedsPaint(); // Recursively call parent’s markNeedsPaint
  } else {
    // If it’s the root node, simply request a new frame
    if (owner != null)
      owner!.requestVisualUpdate();
  }
}
It is worth noting that in the current version of Flutter, the last else branch will never be executed, as the root node is a RenderView, which has its isRepaintBoundary property set to true. Therefore, if renderView.markNeedsPaint() is called, it will take the branch where isRepaintBoundary is true.
After requesting a new frame, when the next frame arrives, the drawFrame process will be executed, involving three functions related to drawing: flushCompositingBits, flushPaint, and compositeFrame. The repainting process occurs in flushPaint, so we will first focus on the flushPaint process. The flushCompositingBits involves the composition of layers in the component tree, which we will discuss in a later subsection, while compositeFrame will be covered later in this section.
4 flushPaint Process
Let's take a look at how this is implemented in the source code. Note that the source code for the flushPaint execution process is quite extensive, so to make it easier for readers to understand the core steps, I'll present a condensed version highlighting the key steps:
Iterate through the list of nodes that need to be painted, and begin painting each one.
final List<RenderObject> dirtyNodes = nodesNeedingPaint;
for (final RenderObject node in dirtyNodes) {
  PaintingContext.repaintCompositedChild(node);
}
Here, it's worth noting that as mentioned in the section on the state update process, when a node in the component tree needs to update itself, it will call the markNeedsRepaint method. This method will search up through the nodes until it finds one with isRepaintBoundary set to true, and then it will add that node to the nodesNeedingPaint list. Therefore, the nodes in nodesNeedingPaint must have isRepaintBoundary set to true, meaning they are all repaint boundary nodes. So how does this boundary work? Let's look at the implementation of PaintingContext.repaintCompositedChild.
static void repaintCompositedChild(RenderObject child, PaintingContext? childContext) {
  assert(child.isRepaintBoundary); // Assertion: if we reach here, isRepaintBoundary must be true.
  OffsetLayer? childLayer = child.layer;
  if (childLayer == null) { // If the boundary node doesn't have a layer, create an OffsetLayer for it.
    final OffsetLayer layer = OffsetLayer();
    child.layer = childLayer = layer;
  } else { // If the boundary node already has a layer, clear its children.
    childLayer.removeAllChildren();
  }

  // Create a painting context using its layer, which binds the layer to childContext,
  // meaning that products drawn using the same painting context's canvas belong to the same layer.
  paintingContext ??= PaintingContext(childLayer, child.paintBounds);

  // Call the node's paint method to draw the child (tree).
  child.paint(paintingContext, Offset.zero);
  childContext.stopRecordingIfNeeded(); // This line will be explained later.
}
As seen, when painting a boundary node, it first checks whether it has a layer. If not, it creates a new OffsetLayer for it. Then, it constructs a PaintingContext object (let's call it context) based on that OffsetLayer. When the child components obtain the canvas object from the context, they will create a PictureLayer, and then associate it with a new Canvas object. This means that the products drawn using the canvas of the same painting context belong to the same PictureLayer. Let's take a look at the relevant source code:
Canvas get canvas {
  // If the canvas is null, it's the first time accessing it;
  if (_canvas == null) _startRecording();
  return _canvas!;
}

// Create PictureLayer and canvas.
void _startRecording() {
  _currentLayer = PictureLayer(estimatedBounds);
  _recorder = ui.PictureRecorder();
  _canvas = Canvas(_recorder!);
  // Add the pictureLayer to the _containerLayer (the layer of the boundary node).
  _containerLayer.append(_currentLayer!);
}
Next, let's look at the implementation of the child.paint method. This method needs to be implemented by the node itself to draw itself. Different types of nodes generally have different drawing algorithms, but the functionality is similar: if it is a container component, it draws its children and itself (of course, a container might not have drawing logic; in such cases, it only draws its children, such as in the Center component).
void paint(PaintingContext context, Offset offset) {
  // ... Draw itself
  if (hasChild) { // If this component is a container, draw its children.
    context.paintChild(child, offset);
  }
  // ... Draw itself
}
Next, let's look at the context.paintChild method. Its main logic is as follows: if the current node is a boundary node and needs to be redrawn, it first calls the previously discussed repaintCompositedChild method. Once that method completes, it adds the current node's layer to the parent boundary node's layer. If the current node is not a boundary node, it calls the paint method (as mentioned earlier):
// Draw the child.
void paintChild(RenderObject child, Offset offset) {
  // If the child node is a boundary node, recursively call repaintCompositedChild.
  if (child.isRepaintBoundary) {
    if (child._needsPaint) { // Only repaint if needed.
      repaintCompositedChild(child);
    }
    // Add the child node's layer to the Layer tree.
    final OffsetLayer childOffsetLayer = child.layer! as OffsetLayer;
    childOffsetLayer.offset = offset;
    // Add the current boundary node's layer to the parent boundary node's layer.
    appendLayer(childOffsetLayer);
  } else {
    // If it's not a boundary node, directly draw itself.
    child.paint(this, offset);
  }
}
Three important points to note here:
When drawing child nodes, if a boundary node is encountered and does not need to be redrawn (
_needsPaintis false), the existing layer of that boundary node will be reused without redrawing! This is the principle that allows boundary nodes to be reused across frames.Since the layer type of a boundary node is
ContainerLayer, it can have child nodes added to it.Note that the current boundary node's layer is added to the parent boundary node, not to the parent node.
After executing the above steps, all the layers of the boundary nodes will eventually connect to form a Layer tree.
5 Creating a New PictureLayer
Now, based on the initial example in this section, let's add a third child, Text5, to the Row, as shown in Figure . What will the Layer tree look like?
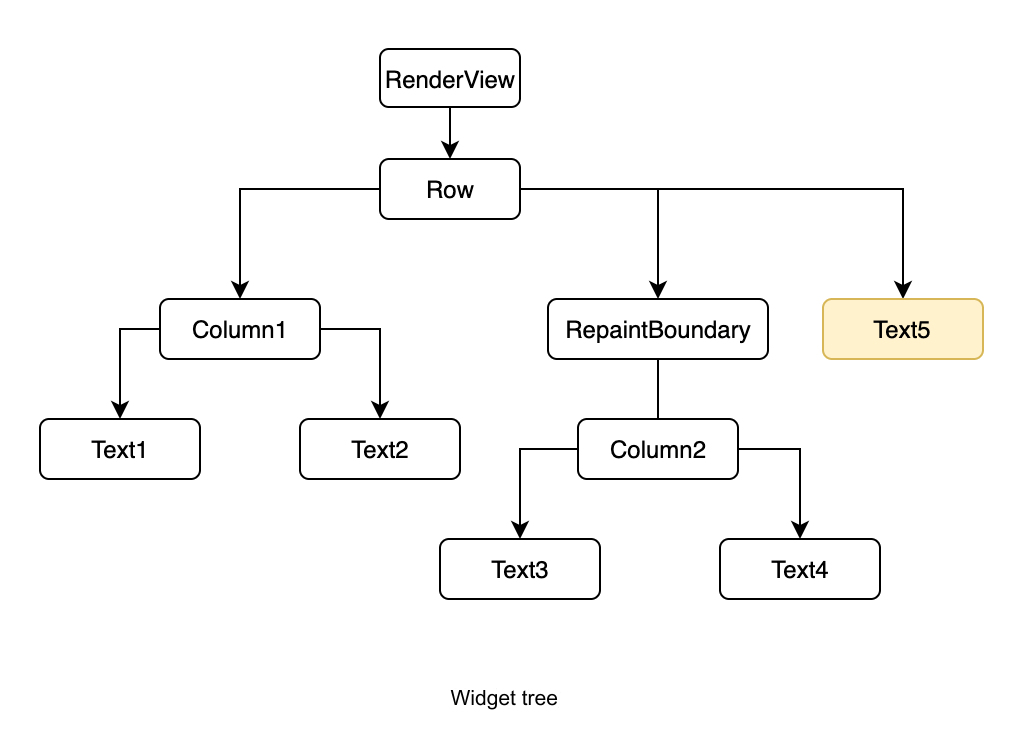
Since Text5 is drawn after the RepaintBoundary has completed its drawing, what happens after the RepaintBoundary adds its layer (OffsetLayer2) to the parent layer (OffsetLayer1)? The answer lies in the last line of the repaintCompositedChild function we discussed earlier:
...
childContext.stopRecordingIfNeeded();
Let’s look at the core code after simplification:
void stopRecordingIfNeeded() {
  _currentLayer!.picture = _recorder!.endRecording(); // Save canvas drawing products in PictureLayer
  _currentLayer = null;
  _recorder = null;
  _canvas = null;
}
When the drawing of the RepaintBoundary reaches childContext.stopRecordingIfNeeded(), the childContext corresponds to OffsetLayer1, _currentLayer is PictureLayer1, and _canvas corresponds to Canvas1. The implementation is straightforward: it first saves the drawing output of Canvas1 in PictureLayer1, then nullifies some variables.
Next, when drawing Text5, it will first use context.canvas for drawing. According to the implementation of the canvas getter, this will invoke the _startRecording() method, which we have covered before. It will regenerate a new PictureLayer and a new Canvas:
Canvas get canvas {
  // If the canvas is null, it's the first time getting it;
  if (_canvas == null) _startRecording();
  return _canvas!;
}
We will refer to the newly created PictureLayer and Canvas as PictureLayer3 and Canvas3. The drawing for Text5 will occur on PictureLayer3, resulting in the final Layer tree as shown in Figure :
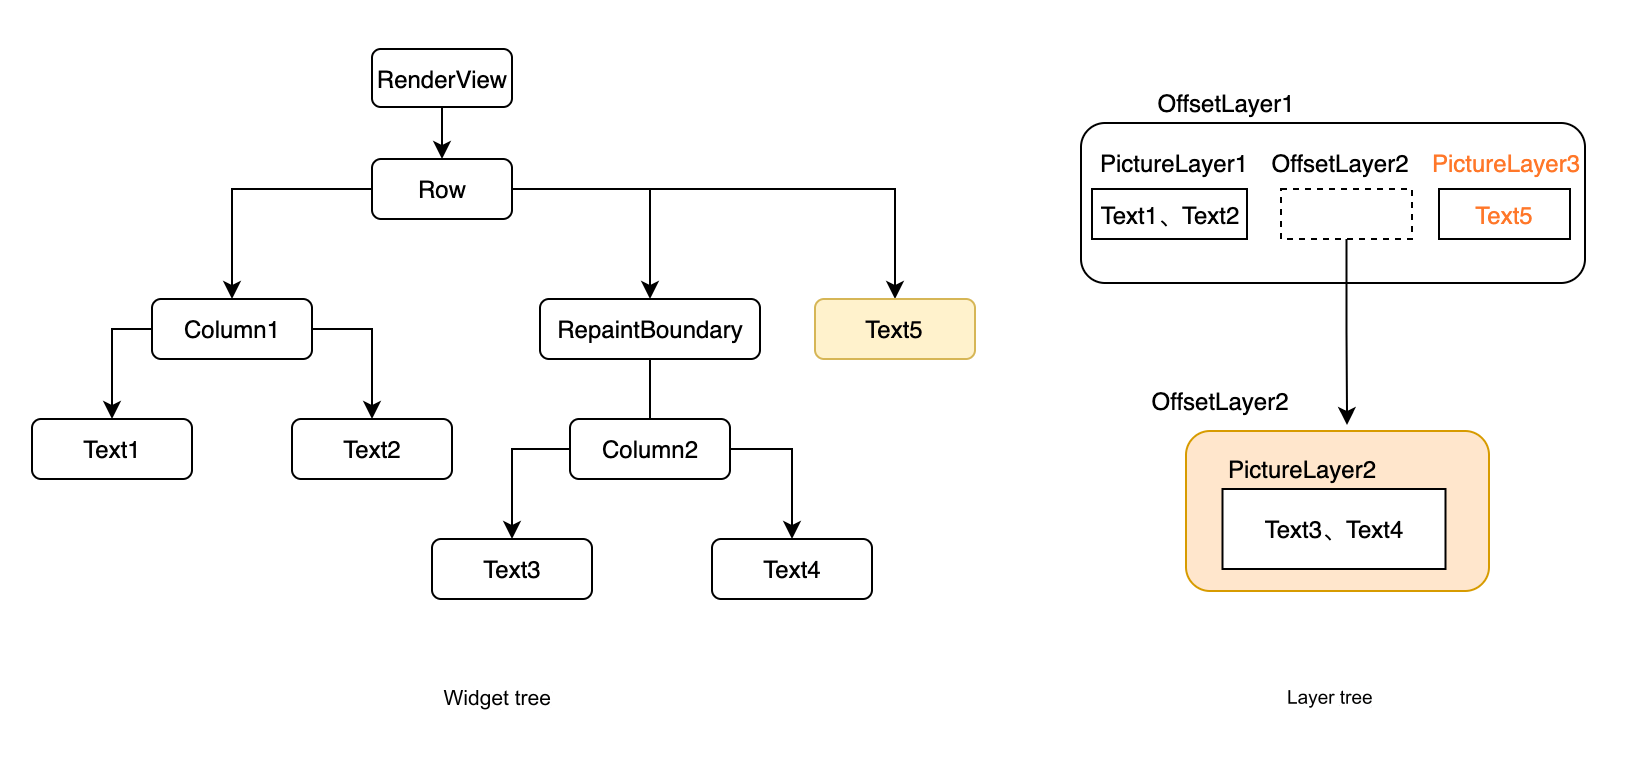
To summarize: when a parent node draws a child node that is a drawing boundary node, a new PictureLayer will be generated after drawing the child. Subsequent other child nodes will be drawn on the new PictureLayer. We understand the principle, but why is this necessary? Is there a problem with directly reusing the previous PictureLayer1? This puzzled me initially, but I realized the answer while working with the Stack component. The conclusion is: in the current example, it wouldn’t be a problem, but in scenarios involving stacked layouts, issues can arise. Let’s look at an example, as depicted in Figure :
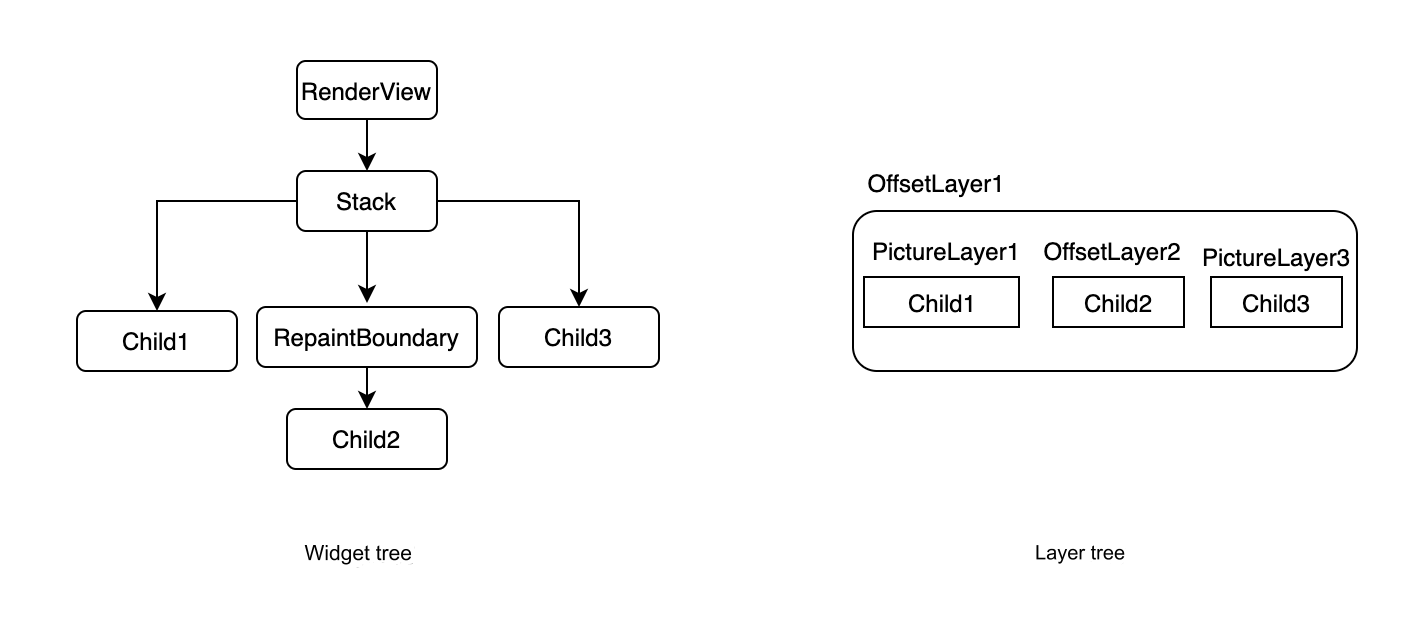
On the left is a Stack layout, and on the right is the corresponding Layer tree structure. We know that in a Stack layout, components are drawn in the order they are added, with the first child at the bottom and the last child at the top. If Child3 reused PictureLayer1 during its drawing, it would be obscured by Child2, which is clearly not expected. However, if a new PictureLayer is created and added to the end of OffsetLayer, the correct result can be achieved.
Now, let's think deeper: if the parent of Child2 is not a RepaintBoundary, does that mean Child3 and Child1 can share the same PictureLayer?
The answer is no! If the parent component of Child2 is changed to a custom component where we wish to apply some matrix transformations to its child nodes during rendering, we would create a new TransformLayer and specify the transformation rules. Afterward, we would pass it to Child2, which needs to add the TransformLayer to the Layer tree (if not added, it won't be displayed). The component tree and the final Layer tree structure would look like Figure :
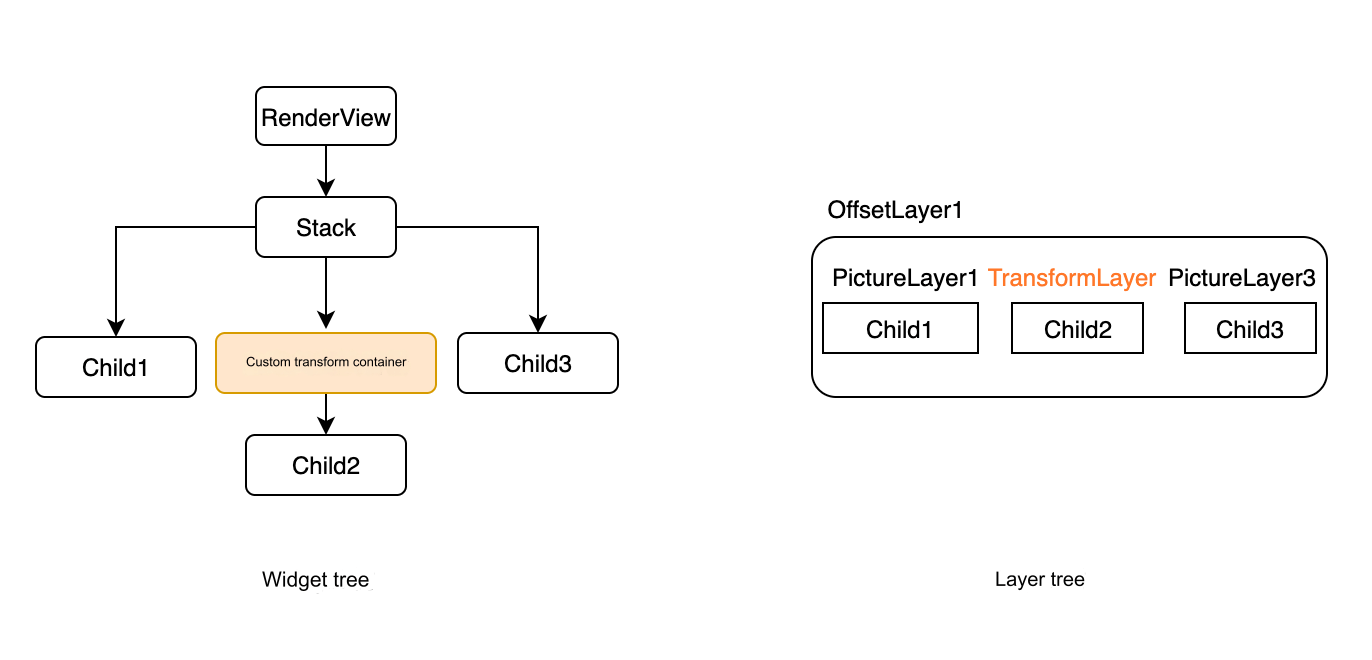
This situation is essentially the same as when using RepaintBoundary. Child3 should still not reuse PictureLayer1. We can now summarize a general rule: whenever a component needs to add a new Layer to the Layer tree, it must also conclude the current PictureLayer's drawing. This is why methods in PaintingContext for adding new Layers to the Layer tree (such as pushLayer, addLayer) include the following two lines:
stopRecordingIfNeeded(); // End the current PictureLayer's drawing first
appendLayer(layer); // Then add it to the layer tree
This is the standard operation for adding Layers to the Layer tree. It’s crucial to remember this conclusion, as we will use it when discussing the principles of flushCompositingBits(). Thus, the final structure of the Layer tree is roughly depicted in Figure (this is just an example and does not correspond to this case):
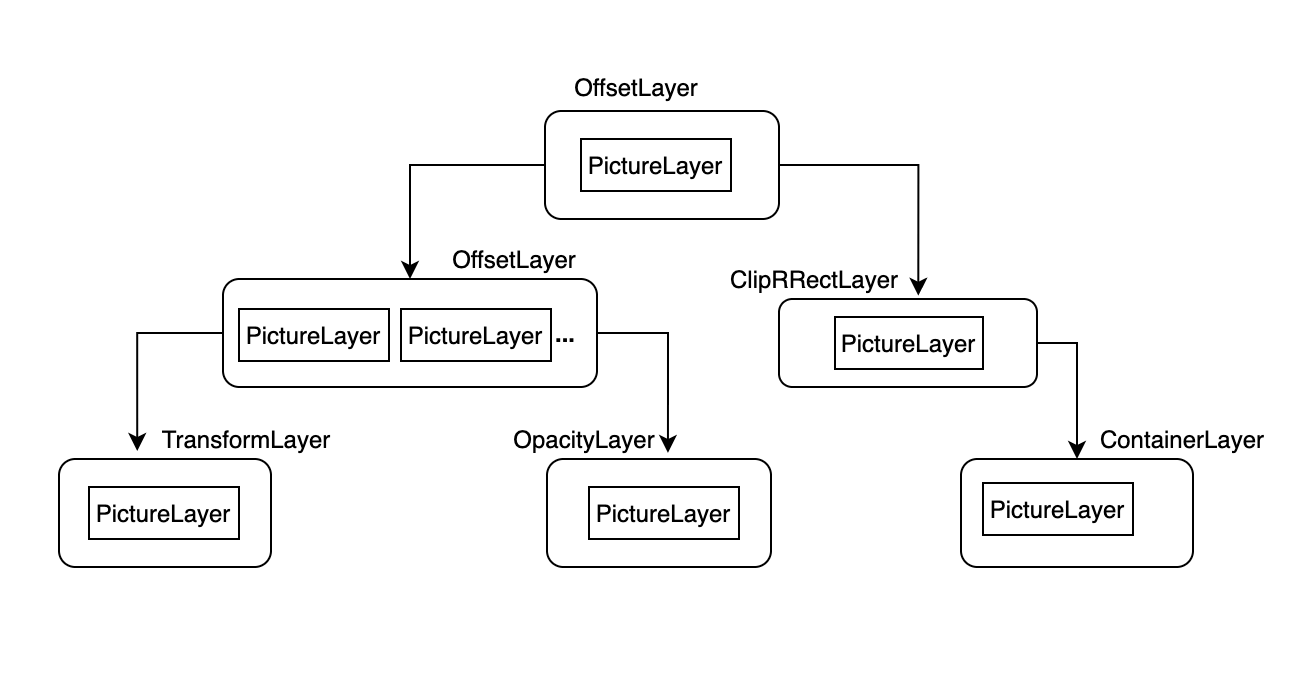
6 compositeFrame
Once the layers are created, the next step is to display them on the screen, and this task is handled by the renderView.compositeFrame method. In fact, its implementation logic is quite simple: it first builds a Scene from the layers, and then renders it using the window.render API:
final ui.SceneBuilder builder = ui.SceneBuilder();
final ui.Scene scene = layer!.buildScene(builder);
window.render(scene);
It’s worth mentioning the process of building the Scene. Let’s take a look at the core source code:
ui.Scene buildScene(ui.SceneBuilder builder) {
  updateSubtreeNeedsAddToScene();
  addToScene(builder); // Key step
  final ui.Scene scene = builder.build();
  return scene;
}
The most critical line here is the call to addToScene. The main function of this method is to pass each layer in the Layer tree to Skia (which ultimately calls a native API; if you want to know more, it's recommended to look at the addToScene methods of OffsetLayer and PictureLayer). This is the final preparatory action before displaying on the screen, and then the window.render is called to send the drawing data to the GPU for rendering!
7 Summary
This section primarily covered the rendering process in Flutter, the Layer tree, and related classes such as Picture, Layer, and PaintingContext. In the next section, we will provide an example to help readers deepen their understanding through practice.

