On Windows, Flutter only supports building and running applications for Android devices, while macOS supports both iOS and Android devices. Below are instructions on how to connect Android and iOS devices to run Flutter applications.
1. Connecting to an Android Emulator
To run and test Flutter applications on an Android emulator, follow these steps:
-
Launch Android Studio > Tools > Android > AVD Manager and select Create Virtual Device.
-
Choose a device and click Next.
-
Select one or more system images for the Android version you want to emulate, and then click Next. It is recommended to use the x86 or x86_64 images.
-
Under Emulated Performance, select Hardware - GLES 2.0 to enable hardware acceleration.
-
Verify that the AVD configuration is correct, then click Finish.
For more detailed instructions, refer to Managing AVDs (opens in a new window).
In the Android Virtual Device Manager, click Run in the toolbar. The emulator will start and display the boot screen of the selected OS version or device.
Run the command flutter run to start the application on your emulator. The connected device name will appear as Android SDK built for <platform>, where <platform> is the chipset, such as x86.
2. Connecting to a Physical Android Device
To run and test Flutter applications on a physical Android device, you need an Android device running Android 4.1 (API level 16) or higher.
-
Enable Developer Options and USB Debugging on the Android device. Detailed instructions can be found in the Android documentation (opens in a new window).
-
Connect your phone to your computer via USB. If prompted to authorize USB debugging, grant access to your computer.
-
Run the command
flutter devicesto verify that Flutter recognizes your connected Android device. -
Run
flutter runto launch the application.
By default, Flutter uses the Android SDK version based on your adb tools version. If you want Flutter to use a different version of the Android SDK, set the ANDROID_HOME environment variable to the directory where the SDK is installed.
3. Connecting to an iOS Simulator
To run and test Flutter applications on an iOS simulator, follow these steps:
-
On your Mac, use Spotlight or run the following command to launch the simulator:
open -a Simulator
-
In the simulator, ensure that a 64-bit device (iPhone 5s or later) is selected by checking Hardware > Device in the menu.
-
Depending on your screen size, simulating an HD iOS device may cause overflow. You can adjust the device scale under Window > Scale in the simulator menu.
-
Run
flutter runto start the Flutter application.
4. Connecting to a Physical iOS Device
To install a Flutter application on a physical iOS device, you will need some additional tools, an Apple account, and a few setup steps in Xcode.
-
Install Homebrew (if you already have brew installed, skip this step).
-
Open a terminal and run the following commands:
brew update
brew install --HEAD libimobiledevice
brew install ideviceinstaller ios-deploy cocoapods
pod setup
If any of these commands fail with errors, run
brew doctorand follow the instructions to resolve the issues. -
Follow the Xcode signing process to configure your project:
-
In your Flutter project directory, open the default Xcode workspace by running
open ios/Runner.xcworkspace. -
In Xcode, select the Runner project in the left-hand navigation panel.
-
On the Runner target settings page, ensure that you have selected your development team under General > Signing > Team. When you select a team, Xcode will create and download development certificates, register your account with your device, and create and download provisioning profiles if necessary.
To start your first iOS development project, you may need to sign in to Xcode with your Apple ID, as shown in Figure:
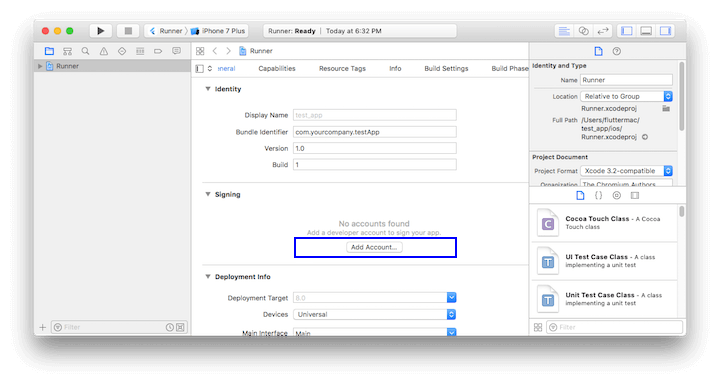
Any Apple ID can be used for development and testing, but if you want to distribute apps to the App Store, you will need to enroll in the Apple Developer Program. You can find more details about this yourself.
The first time you connect a physical iOS device for development, you will need to trust both your Mac and the development certificate on your device. When you connect the iOS device to your Mac for the first time, select Trust in the dialog box, as shown in Figure:
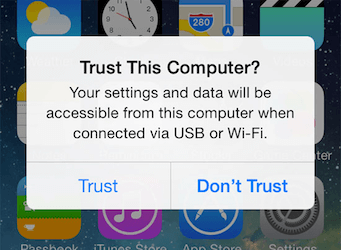
Add Trust
Then, go to the Settings menu on your iOS device, choose General > Device Management, and trust your certificate.
If automatic signing in Xcode fails, verify that the General > Identity > Bundle Identifier value is unique, as shown in Figure:
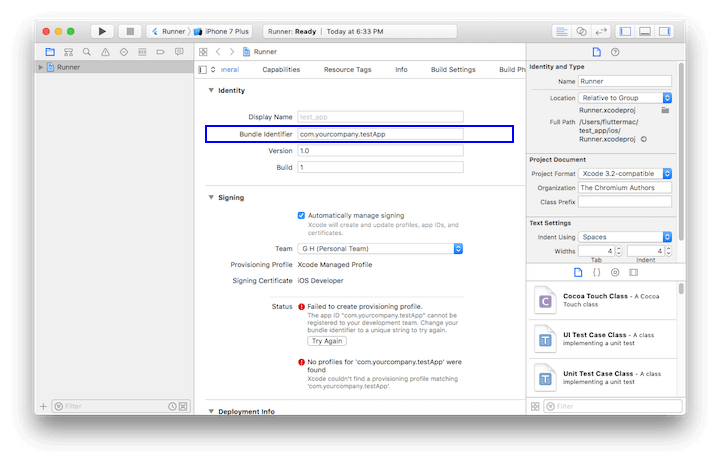
Verify Bundle ID Uniqueness
Run flutter run to start the Flutter application.
