In the previous sections, we introduced commonly used scrollable components in Flutter and mentioned that the scroll position of these components can be controlled using ScrollController. This section will first introduce ScrollController, then use ListView as an example to demonstrate how to use ScrollController. Finally, we will discuss how to save the scroll position during route transitions.
40.1 ScrollController
The constructor for ScrollController is as follows:
ScrollController({
  double initialScrollOffset = 0.0, // Initial scroll position
  this.keepScrollOffset = true, // Whether to save the scroll position
  ...
})
Let’s introduce some commonly used properties and methods of ScrollController:
offset: The current scroll position of the scrollable component.jumpTo(double offset), animateTo(double offset, ...): These two methods are used to jump to a specified position; the difference is that the latter executes an animation during the jump, while the former does not.
ScrollController also has other properties and methods that will be explained later in the principles section.
1. Scroll Listener
ScrollController indirectly inherits from Listenable, allowing us to listen for scroll events like this:
controller.addListener(() => print(controller.offset));
2. Example
We create a ListView that prints the current scroll position when it changes. If the current position exceeds 1000 pixels, a "Scroll to Top" button is displayed in the bottom right corner. Clicking this button will return the ListView to its initial position; if it does not exceed 1000 pixels, the button is hidden. The code is as follows:
class ScrollControllerTestRoute extends StatefulWidget {
  @override
  ScrollControllerTestRouteState createState() {
    return ScrollControllerTestRouteState();
  }
}

class ScrollControllerTestRouteState extends State<ScrollControllerTestRoute> {
  ScrollController _controller = ScrollController();
  bool showToTopBtn = false; // Whether to show the "Scroll to Top" button

  @override
  void initState() {
    super.initState();
    // Listen for scroll events and print the scroll position
    _controller.addListener(() {
      print(_controller.offset); // Print the scroll position
      if (_controller.offset < 1000 && showToTopBtn) {
        setState(() {
          showToTopBtn = false;
        });
      } else if (_controller.offset >= 1000 && showToTopBtn == false) {
        setState(() {
          showToTopBtn = true;
        });
      }
    });
  }

  @override
  void dispose() {
    // To avoid memory leaks, call _controller.dispose
    _controller.dispose();
    super.dispose();
  }

  @override
  Widget build(BuildContext context) {
    return Scaffold(
      appBar: AppBar(title: Text("Scroll Control")),
      body: Scrollbar(
        child: ListView.builder(
          itemCount: 100,
          itemExtent: 50.0, // It's a good practice to explicitly specify height for fixed-height items (lower performance cost)
          controller: _controller,
          itemBuilder: (context, index) {
            return ListTile(title: Text("$index"));
          }
        ),
      ),
      floatingActionButton: !showToTopBtn ? null : FloatingActionButton(
        child: Icon(Icons.arrow_upward),
        onPressed: () {
          // Execute animation to return to the top
          _controller.animateTo(
            .0,
            duration: Duration(milliseconds: 200),
            curve: Curves.ease,
          );
        }
      ),
    );
  }
}
The code explanation is included in the comments, and the running effect is shown in Figures .
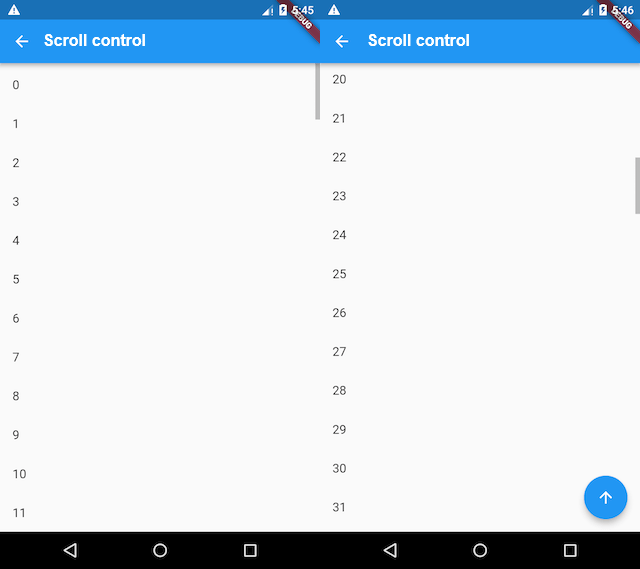
Since the height of each list item is 50 pixels, after scrolling to the 20th item, the "Scroll to Top" button appears in the bottom right corner. Clicking this button will animate the ListView back to the top over 200 milliseconds, using the Curves.ease animation curve. We will discuss animations in detail in the later chapter on "Animations."
3. Restoring Scroll Position
PageStorage is a component used to save page (route) related data. It does not affect the UI appearance of the subtree. In fact, PageStorage is a functional component that has a storage bucket. Widgets in the subtree can store their data or state using different PageStorageKey.
Whenever scrolling ends, the scrollable component will store its scroll position (offset) in PageStorage, which can be restored when the scrollable component is recreated. If ScrollController.keepScrollOffset is false, the scroll position will not be stored, and the scrollable component will use ScrollController.initialScrollOffset upon recreation. When ScrollController.keepScrollOffset is true, the scrollable component will scroll to initialScrollOffset upon its first creation, as the scroll position has not yet been stored. In subsequent scrolls, the scroll position will be stored and restored, while initialScrollOffset will be ignored.
When a route contains multiple scrollable components, if you find that the scroll position does not correctly restore after certain transitions or switches, you can explicitly specify PageStorageKey to track the positions of different scrollable components separately, such as:
ListView(key: PageStorageKey(1), ...);
...
ListView(key: PageStorageKey(2), ...);
Different PageStorageKey values are required to save the scroll positions for different scrollable components.
Note: When a route contains multiple scrollable components, it is not necessary to provide separate PageStorageKey to track their scroll positions. This is because Scrollable itself is a StatefulWidget, and its state retains the current scroll position. Therefore, as long as the scrollable component is not removed from the widget tree (detached), its state will not be disposed, and the scroll position will not be lost. The scroll position will only be lost when the widget undergoes structural changes that cause the state of the scrollable component to be disposed or rebuilt, which necessitates explicitly specifying PageStorageKey to store the scroll position. A typical scenario is when using TabBarView; when the tab changes, the state of the scrollable component in the tab will be disposed, and specifying PageStorageKey will be required to restore the scroll position.
4. ScrollPosition
ScrollPosition is used to store the scroll position of a scrollable component. A single ScrollController object can be used by multiple scrollable components, creating a ScrollPosition object for each scrollable component. These ScrollPosition objects are stored in the positions property of ScrollController (List<ScrollPosition>). ScrollPosition is the actual object that saves the scroll position information, while offset is just a convenient property:
double get offset => position.pixels;
Although a single ScrollController can correspond to multiple scrollable components, certain operations, such as reading the scroll position (offset), require a one-to-one correspondence. However, we can still read the scroll positions in a one-to-many scenario using other methods. For example, if a ScrollController is used by two scrollable components, we can read their scroll positions as follows:
controller.positions.elementAt(0).pixels;
controller.positions.elementAt(1).pixels;
We can determine how many scrollable components are using the controller by checking controller.positions.length.
Methods of ScrollPosition
ScrollPosition has two commonly used methods: animateTo() and jumpTo(). These are the methods that actually control the jump to the specified scroll position. The two similarly named methods in ScrollController will ultimately call those in ScrollPosition.
5. Control Principle of ScrollController
Let’s introduce three other methods of ScrollController:
ScrollPosition createScrollPosition(
    ScrollPhysics physics,
    ScrollContext context,
    ScrollPosition oldPosition);
void attach(ScrollPosition position);
void detach(ScrollPosition position);
When a ScrollController is associated with a scrollable component, the scrollable component will first call createScrollPosition() to create a ScrollPosition that stores the scroll position information. Then, the scrollable component will call the attach() method to add the created ScrollPosition to the positions property of ScrollController. This step is referred to as "registering the position"; only after registration can animateTo() and jumpTo() be called.
When the scrollable component is destroyed, it will call the detach() method of ScrollController to remove its ScrollPosition object from the positions property. This step is referred to as "unregistering the position"; after unregistration, animateTo() and jumpTo() can no longer be called.
It is important to note that ScrollController’s animateTo() and jumpTo() methods will internally call animateTo() and jumpTo() for all ScrollPosition objects, ensuring that all scrollable components associated with the ScrollController scroll to the specified position.
40.2 Scroll Listening
1. Scroll Notifications
In the Flutter widget tree, child widgets can communicate with parent (including ancestor) widgets by sending notifications. Parent components can use the NotificationListener to listen for notifications of interest. This communication method is similar to event bubbling in web development, and we continue to use the term "bubbling" in Flutter. More details on notification bubbling will be discussed in the "Event Handling and Notifications" chapter later.
When a scrollable component scrolls, it sends a ScrollNotification type notification. The ScrollBar listens for scroll notifications to function. There are two main differences between listening for scroll events with NotificationListener and using ScrollController:
NotificationListenercan listen at any position between the scrollable component and the root of the widget tree, whileScrollControllercan only be associated with specific scrollable components.The information received from scroll events differs;
NotificationListenercarries information about the current scroll position and the viewport, whileScrollControllercan only access the current scroll position.
2. Example
Below, we listen for scroll notifications from a ListView and display the current scroll progress percentage:
import 'package:flutter/material.dart';

class ScrollNotificationTestRoute extends StatefulWidget {
  @override
  _ScrollNotificationTestRouteState createState() =>
      _ScrollNotificationTestRouteState();
}

class _ScrollNotificationTestRouteState
    extends State<ScrollNotificationTestRoute> {
  String _progress = "0%"; // Store progress percentage

  @override
  Widget build(BuildContext context) {
    return Scrollbar(
      // Progress bar
      // Listen for scroll notifications
      child: NotificationListener<ScrollNotification>(
        onNotification: (ScrollNotification notification) {
          double progress = notification.metrics.pixels /
              notification.metrics.maxScrollExtent;
          // Rebuild
          setState(() {
            _progress = "${(progress * 100).toInt()}%";
          });
          print("BottomEdge: ${notification.metrics.extentAfter == 0}");
          return false;
          // return true; // Uncommenting this line will disable the progress bar
        },
        child: Stack(
          alignment: Alignment.center,
          children: <Widget>[
            ListView.builder(
              itemCount: 100,
              itemExtent: 50.0,
              itemBuilder: (context, index) => ListTile(title: Text("$index")),
            ),
            CircleAvatar(
              // Display progress percentage
              radius: 30.0,
              child: Text(_progress),
              backgroundColor: Colors.black54,
            )
          ],
        ),
      ),
    );
  }
}
The output looks like the illustrations in Figure .
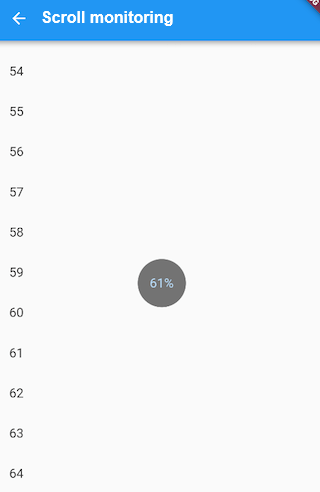
When a scroll event is received, the parameter type is ScrollNotification, which includes a metrics property of type ScrollMetrics. This property contains information about the current viewport and scroll position, including:
pixels: The current scroll position.maxScrollExtent: The maximum scrollable length.extentBefore: The length that has scrolled out of the viewport from the top; in this example, it corresponds to the length of the list that has scrolled off the screen above.extentInside: The length inside the viewport; in this example, it represents the visible portion of the list on the screen.extentAfter: The length of the list that has not entered the viewport; in this example, it corresponds to the portion of the list at the bottom that is not displayed on the screen.atEdge: Whether it has reached the boundary of the scrollable component (in this example, this corresponds to the top or bottom of the list).
ScrollMetrics has several other properties that readers can refer to in the API documentation.
