Layout Process
The layout process primarily determines the layout information (size and position) for each component. The Flutter layout process is as follows:
The parent node passes constraint information to the child nodes, limiting the maximum and minimum width and height of the child nodes.
The child nodes determine their size based on the constraint information.
The parent node determines the position of each child node in the parent node’s layout space according to specific layout rules (different layout components have different layout algorithms), represented by an offset.
This process is recursive, determining the size and position of each node.
As we can see, the size of a component is determined by itself, while its position is determined by the parent component.
Flutter has many layout classes, which can be categorized into single-child and multi-child components based on the number of children. Below, we will intuitively understand the Flutter layout process by custom implementing a single-child component and a multi-child component, followed by a discussion of the layout update process and constraints in Flutter.
1 Single-Child Component Layout Example (CustomCenter)
We will implement a single-child component called CustomCenter, which functions similarly to the Center component. This example will demonstrate the main flow of the layout process.
First, we define the component. To explain the layout principles, we will not implement the component through composition; instead, we will directly customize the RenderObject. Since the centering component needs to include a child node, we directly inherit from SingleChildRenderObjectWidget.
class CustomCenter extends SingleChildRenderObjectWidget {
  const CustomCenter({Key? key, required Widget child})
      : super(key: key, child: child);

  @override
  RenderObject createRenderObject(BuildContext context) {
    return RenderCustomCenter();
  }
}
Next, we implement RenderCustomCenter. Here, directly inheriting from RenderObject will get us closer to the lower level, but it requires us to manually implement some non-layout-related functionalities, such as event dispatching. To focus more on the layout itself, we choose to inherit from RenderShiftedBox, which will help us implement some functionalities beyond layout, allowing us to only override performLayout to implement the centering algorithm for the child node.
class RenderCustomCenter extends RenderShiftedBox {
  RenderCustomCenter({RenderBox? child}) : super(child);

  @override
  void performLayout() {
    // 1. First layout the child component and obtain its size.
    child!.layout(
      constraints.loosen(), // Pass constraints to the child node.
      parentUsesSize: true, // We need to use the child's size, so this cannot be false.
    );
    // 2. Determine the size of the current component based on the child's size.
    size = constraints.constrain(Size(
      constraints.maxWidth == double.infinity
          ? child!.size.width
          : double.infinity,
      constraints.maxHeight == double.infinity
          ? child!.size.height
          : double.infinity,
    ));

    // 3. Calculate the offset for the child node to center it within the parent node,
    // and store this offset in the child's parentData for later use in the painting phase.
    BoxParentData parentData = child!.parentData as BoxParentData;
    parentData.offset = ((size - child!.size) as Offset) / 2;
  }
}
In the layout process, note the following three points:
When laying out the child node, the constraints are the constraint information passed from the parent component (CustomCenter). We pass the constraint information to the child node using
constraints.loosen(). Here is the implementation ofloosen:
BoxConstraints loosen() {
  return BoxConstraints(
    minWidth: 0.0,
    maxWidth: maxWidth,
    minHeight: 0.0,
    maxHeight: maxHeight,
  );
}
Clearly, CustomCenter constrains the child node's maximum width and height not to exceed its own maximum width and height.
Under the constraints of the parent node (CustomCenter), the child node determines its width and height. At this point,
CustomCenterwill determine its own width and height based on the child's dimensions. The logic in the above code states that if the maximum width and height constraints passed toCustomCenterfrom its parent are infinite, then its width and height will be set to the child's dimensions. Note that ifCustomCenter's width and height are also set to infinite at this time, there will be a problem. If its own width and height are also infinite within an infinite range, it is unclear what the actual size is, leaving its parent node puzzled! The size of the screen is fixed, which is clearly unreasonable. If the maximum width and height constraints passed toCustomCenterare not infinite, it is permissible to specify its own width and height as infinite, because within a finite space, if the child node claims to be infinite, the maximum size is at most that of the parent node. In summary,CustomCenterwill try its best to fill the space of its parent.After determining its own size and the child's size,
CustomCentercan then determine the position of the child node. Using the centering algorithm, it calculates the origin coordinates of the child node and saves them in the child'sparentData, which will be used in the subsequent painting phase. To see how it is used, we can check the default paint implementation inRenderShiftedBox:
@override
void paint(PaintingContext context, Offset offset) {
  if (child != null) {
    final BoxParentData childParentData = child!.parentData! as BoxParentData;
    // Retrieve the offset of the child node relative to the current node from child.parentData,
    // and add the current node's offset on the screen.
    // This gives us the child's offset on the screen.
    context.paintChild(child!, childParentData.offset + offset);
  }
}
The performLayout Process
As seen, the layout logic is implemented in the performLayout method. Let's summarize what performLayout specifically does:
If there is a child component, recursively layout the child component.
Determine the size of the current component (
size), which typically depends on the size of the child component.Determine the starting offset of the child component within the current component.
In the Flutter component library, there are several commonly used single-child components such as Align, SizedBox, DecoratedBox, etc., which you can look into to examine their implementations.
Next, let's look at an example of a multi-child component.
2 Multi-Child Component Layout Example (LeftRightBox)
In practical development, we often use left-right edge layouts. Now, we will implement a LeftRightBox component to achieve this layout, which contains two children stored in a widget array.
First, we define the component. Unlike single-child components, multi-child components need to inherit from MultiChildRenderObjectWidget:
class LeftRightBox extends MultiChildRenderObjectWidget {
  LeftRightBox({
    Key? key,
    required List<Widget> children,
  })  : assert(children.length == 2, "Only two children are allowed."),
        super(key: key, children: children);

  @override
  RenderObject createRenderObject(BuildContext context) {
    return RenderLeftRight();
  }
}
Next, we need to implement RenderLeftRight, where we will implement the left-right layout algorithm in performLayout:
class LeftRightParentData extends ContainerBoxParentData<RenderBox> {}

class RenderLeftRight extends RenderBox
    with
        ContainerRenderObjectMixin<RenderBox, LeftRightParentData>,
        RenderBoxContainerDefaultsMixin<RenderBox, LeftRightParentData> {

  // Initialize the parentData for each child
  @override
  void setupParentData(RenderBox child) {
    if (child.parentData is! LeftRightParentData)
      child.parentData = LeftRightParentData();
  }

  @override
  void performLayout() {
    final BoxConstraints constraints = this.constraints;
    RenderBox leftChild = firstChild!;

    LeftRightParentData childParentData =
        leftChild.parentData! as LeftRightParentData;

    RenderBox rightChild = childParentData.nextSibling!;

    // We restrict the right child's width to not exceed half of the total width.
    rightChild.layout(
      constraints.copyWith(maxWidth: constraints.maxWidth / 2),
      parentUsesSize: true,
    );

    // Adjust the offset for the right child node.
    childParentData = rightChild.parentData! as LeftRightParentData;
    childParentData.offset = Offset(
      constraints.maxWidth - rightChild.size.width,
      0,
    );

    // Layout the left child.
    // The offset of the left child defaults to (0, 0); we do not modify it to ensure it is always visible.
    leftChild.layout(
      // The maximum remaining width on the left side.
      constraints.copyWith(
        maxWidth: constraints.maxWidth - rightChild.size.width,
      ),
      parentUsesSize: true,
    );

    // Set the size of LeftRight itself.
    size = Size(
      constraints.maxWidth,
      max(leftChild.size.height, rightChild.size.height),
    );
  }

  @override
  void paint(PaintingContext context, Offset offset) {
    defaultPaint(context, offset);
  }

  @override
  bool hitTestChildren(BoxHitTestResult result, {required Offset position}) {
    return defaultHitTestChildren(result, position: position);
  }
}
As you can see, the actual layout process is not significantly different from that of single-child nodes; however, multi-child components need to layout multiple child nodes simultaneously. Additionally, unlike RenderCustomCenter, RenderLeftRight directly inherits from RenderBox and mixes in ContainerRenderObjectMixin and RenderBoxContainerDefaultsMixin. These two mixins implement generic drawing and event handling logic (which will be discussed in later chapters).
3 About ParentData
In the above two examples, we used the parentData object of the child nodes (to store the offset information of the child nodes) in the implementation of the corresponding RenderObject. While parentData belongs to the child’s attributes, it is set and used within the parent node, which is why it is called "parentData." In fact, in the Flutter framework, the parentData attribute is mainly designed to save component layout information during the layout phase.
It is important to note that "parentData is used to store the layout information of nodes" is merely a convention. When defining components, we can store the layout information of child nodes anywhere and even save non-layout information. However, it is strongly recommended to follow Flutter’s conventions, as this will make our code easier for others to understand and maintain.
4 Layout Updates
In theory, when the layout of a component changes, it can affect the layout of other components. Therefore, when there is a layout change in a component, the simplest approach would be to relayout (rearrange) the entire component tree! However, the cost of relayouting all components is too high, so we need to explore ways to reduce the cost of relayout. In fact, in certain scenarios, we only need to relayout a subset of components after a change (instead of relayouting the entire tree).
4-1. Relayout Boundary
Suppose we have a component tree structure of a page as shown in Figure :
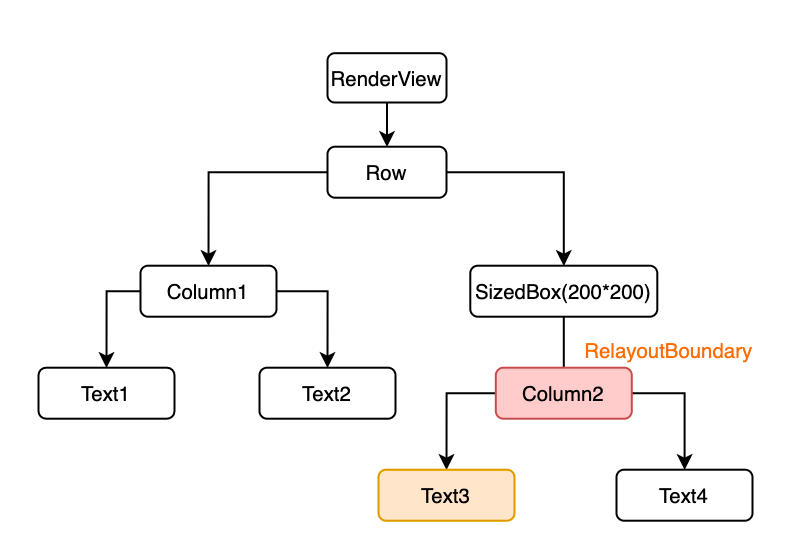
If the text length of Text3 changes, it will cause the position of Text4 and the size of Column2 to change as well. Since the parent component SizedBox has already constrained its size, the size and position of SizedBox will not change. Thus, the components that need to be relayouted are Text3 and Column2. It's important to note:
Text4does not need to be relayouted because its size has not changed; only its position has changed, and its position is determined whenColumn2is laid out.It is easy to see that if there are other components between
Text3andColumn2, those components would also need to be relayouted.
In this example, Column2 is the relayout boundary for Text3. Each component's renderObject has a _relayoutBoundary attribute pointing to its layout boundary node. If the layout of the current node changes, all nodes in the path from itself to its layout boundary node need to be relayouted.
So, what are the conditions for a component to be a relayout boundary? There is one principle and four scenarios. The principle is that "the size change of the component itself does not affect its parent." If a component meets any of the following four conditions, it is a relayout boundary:
The size of the current component does not depend on the size of its parent. In this case, the parent will call the child’s layout function with a
parentUsesSizeparameter, which isfalse, indicating that the parent's layout algorithm does not depend on the child's size.The size of the component depends only on the constraints passed by the parent and does not depend on the size of descendant components. In this case, changes in the size of descendant components will not affect its own size, and the component's
sizedByParentattribute must betrue(which we will discuss later).The constraints passed by the parent to itself are strict constraints (fixed width and height, which will be discussed later). In this case, even if the size of the component depends on descendant elements, it will not affect its parent.
The component is a root component. The root component of a Flutter application is
RenderView, which has a default size of the current device's screen size.
The corresponding code implementation is as follows:
// When parent is! RenderObject is true, it indicates that the current component is a root component,
// as only root components do not have a parent.
if (!parentUsesSize || sizedByParent || constraints.isTight || parent is! RenderObject) {
  _relayoutBoundary = this;
} else {
  _relayoutBoundary = (parent! as RenderObject)._relayoutBoundary;
}
The conditions in the if statement correspond one-to-one with the four conditions listed above, except for the second condition (sizedByParent being true), which is more intuitive and will be specifically addressed later.
4-2. markNeedsLayout
When the layout of a component changes, it needs to call the markNeedsLayout method to update its layout. This method primarily has two functions:
Marks all nodes in its relayout boundary path as "needing layout."
Requests a new frame; during the new frame, the nodes marked as "needing layout" will be relayouted.
Let's look at its core source code:
void markNeedsLayout() {
  _needsLayout = true;
  if (_relayoutBoundary != this) { // If it is not a layout boundary node
    markParentNeedsLayout(); // Recursively call the markNeedsLayout method for all nodes from the previous node to its layout boundary node
  } else { // If it is a layout boundary node
    if (owner != null) {
      // Add the layout boundary node to the pipelineOwner._nodesNeedingLayout list
      owner!._nodesNeedingLayout.add(this);
      owner!.requestVisualUpdate(); // This function will ultimately request a new frame
    }
  }
}
4-3. flushLayout()
After markNeedsLayout has executed, it adds its relayout boundary node to the pipelineOwner._nodesNeedingLayout list and requests a new frame. When the new frame arrives, it executes the drawFrame method (as referenced in the previous section):
void drawFrame() {
  pipelineOwner.flushLayout(); // Re-layout
  pipelineOwner.flushCompositingBits();
  pipelineOwner.flushPaint();
  ...
}
flushLayout() will relayout the nodes that were previously added to _nodesNeedingLayout. Let's take a look at its core source code:
void flushLayout() {
  while (_nodesNeedingLayout.isNotEmpty) {
    final List<RenderObject> dirtyNodes = _nodesNeedingLayout;
    _nodesNeedingLayout = <RenderObject>[];
    // Re-layout after sorting the nodes by their depth in the tree from smallest to largest.
    for (final RenderObject node in dirtyNodes..sort((a, b) => a.depth - b.depth)) {
      if (node._needsLayout && node.owner == this)
        node._layoutWithoutResize(); // Re-layout
    }
  }
}
Let's take a look at the implementation of _layoutWithoutResize:
void _layoutWithoutResize() {
  performLayout(); // Re-layout; will recursively layout descendant nodes
  _needsLayout = false;
  markNeedsPaint(); // After the layout is updated, the UI also needs to be updated
}
The code is straightforward and will not be elaborated upon further.
Thought Question: Why must dirtyNodes in flushLayout() be sorted from smallest to largest depth in the tree before refreshing the layout? Would sorting from largest to smallest work?
4-4. Layout Process
If a component has child components, the layout method must call the layout method of the child components to layout them first. Let's look at the core flow of layout:
void layout(Constraints constraints, { bool parentUsesSize = false }) {
  RenderObject? relayoutBoundary;
  // First determine the layout boundary of the current component.
  if (!parentUsesSize || sizedByParent || constraints.isTight || parent is! RenderObject) {
    relayoutBoundary = this;
  } else {
    relayoutBoundary = (parent! as RenderObject)._relayoutBoundary;
  }
  // _needsLayout indicates whether the current component is marked for layout.
  // _constraints is the constraints passed to the current component by the parent during the last layout.
  // _relayoutBoundary is the layout boundary of the current component during the last layout.
  // Therefore, if the current component is not marked for relayout, and the constraints passed by the parent have not changed,
  // and the layout boundary has also not changed, then it does not need to be relayouted and can return directly.
  if (!_needsLayout && constraints == _constraints && relayoutBoundary == _relayoutBoundary) {
    return;
  }
  // If a relayout is needed, cache the constraints and layout boundary.
  _constraints = constraints;
  _relayoutBoundary = relayoutBoundary;

  // Explanation follows.
  if (sizedByParent) {
    performResize();
  }
  // Perform layout.
  performLayout();
  // After the layout ends, set _needsLayout to false.
  _needsLayout = false;
  // Mark the current component as needing repaint (because the layout has changed and needs to be redrawn).
}
In summary, the layout process consists of the following steps:
Determine the layout boundary of the current component.
Check whether a relayout is needed; if not, return directly. To avoid needing a layout, the following three conditions must be met:
The current component is not marked for relayout.
The constraints passed by the parent have not changed.
The layout boundary of the current component has not changed.
Call
performLayout()for the layout. SinceperformLayout()will call the layout method of the child components, this creates a recursive process. Once the recursion ends, the layout of the entire component tree is complete.Request a repaint.
5 sizedByParent
In the layout method, the following logic exists:
if (sizedByParent) {
  performResize(); // Re-determine component size
}
As mentioned earlier, when sizedByParent is true, it means that the size of the current component depends solely on the constraints passed by the parent and does not rely on the size of descendant components. Previously, we noted that the current component's size is typically dependent on the sizes of its child components in performLayout. However, if sizedByParent is true, then the current component's size does not depend on its child components. To maintain logical clarity, the Flutter framework stipulates that when sizedByParent is true, the logic for determining the current component's size should be extracted to performResize(). In this case, the main tasks of performLayout are limited to laying out the child components and determining the starting position offset of the child components within the current component.
Let’s illustrate how to layout components when sizedByParent is true through an example called AccurateSizedBox.
AccurateSizedBox
In Flutter, the SizedBox component passes its parent's constraints to its child components. This means that if the parent component restricts the minimum width to 100, specifying a width of 50 through SizedBox will be ineffective, as the implementation of SizedBox ensures that its child components must first satisfy the constraints of the SizedBox parent. Do you remember the previous example where we wanted to limit the size of the loading component in the AppBar?
AppBar(
  title: Text(title),
  actions: <Widget>[
    SizedBox( // Attempting to customize loading width and height with SizedBox
      width: 20,
      height: 20,
      child: CircularProgressIndicator(
        strokeWidth: 3,
        valueColor: AlwaysStoppedAnimation(Colors.white70),
      ),
    )
  ],
)
The actual result is shown in Figure :

The reason it does not take effect is that the parent component restricts the minimum height. Of course, we could use UnconstrainedBox combined with SizedBox to achieve our desired effect, but here we want a single component to handle this. Thus, we will create a custom AccurateSizedBox component, which differs from SizedBox mainly in that AccurateSizedBox will adhere to the constraints passed by its parent rather than requiring its child components to satisfy the constraints of AccurateSizedBox. Specifically:
The size of
AccurateSizedBoxdepends only on the constraints from the parent and the user-specified width and height.After determining its size,
AccurateSizedBoxrestricts the size of its child components.
Here’s the code:
class AccurateSizedBox extends SingleChildRenderObjectWidget {
  const AccurateSizedBox({
    Key? key,
    this.width = 0,
    this.height = 0,
    required Widget child,
  }) : super(key: key, child: child);

  final double width;
  final double height;

  @override
  RenderObject createRenderObject(BuildContext context) {
    return RenderAccurateSizedBox(width, height);
  }

  @override
  void updateRenderObject(context, RenderAccurateSizedBox renderObject) {
    renderObject
      ..width = width
      ..height = height;
  }
}

class RenderAccurateSizedBox extends RenderProxyBoxWithHitTestBehavior {
  RenderAccurateSizedBox(this.width, this.height);

  double width;
  double height;

  // The size of the current component depends only on the constraints passed by the parent
  @override
  bool get sizedByParent => true;

  // Called in performResize
  @override
  Size computeDryLayout(BoxConstraints constraints) {
    // Set the current element's width and height, adhering to the parent's constraints
    return constraints.constrain(Size(width, height));
  }

  // @override
  // void performResize() {
  //   // Default behavior for subclasses that have sizedByParent = true
  //   size = computeDryLayout(constraints);
  //   assert(size.isFinite);
  // }

  @override
  void performLayout() {
    child!.layout(
      BoxConstraints.tight(
          Size(min(size.width, width), min(size.height, height))),
      // The parent container is of fixed size; changes in the child's size do not affect the parent.
      // When parentUsesSize is false, the child's layout boundary will be itself, and layout changes in the child will not affect the current component.
      parentUsesSize: false,
    );
  }
}
There are three points to note about the code above:
Our
RenderAccurateSizedBoxno longer directly inherits fromRenderBox, but instead fromRenderProxyBoxWithHitTestBehavior, which indirectly inherits fromRenderBoxand includes default hit testing and drawing logic. By inheriting from it, we do not need to implement this logic manually.We moved the logic for determining the current component's size into the
computeDryLayoutmethod. TheperformResizemethod ofRenderBoxcallscomputeDryLayout, using its return value as the current component's size. According to Flutter's conventions, we should overridecomputeDryLayoutrather thanperformResize, just as we should overrideperformLayoutrather thanlayout. This is merely a convention, not a rule, but we should adhere to it as much as possible unless we are clear on what we are doing and can ensure that future maintainers of our code will also understand.When
RenderAccurateSizedBoxcalls the layout of its child component, it setsparentUsesSizetofalse, making the child component a layout boundary.
Now let's test it:
class AccurateSizedBoxRoute extends StatelessWidget {
  const AccurateSizedBoxRoute({Key? key}) : super(key: key);

  @override
  Widget build(BuildContext context) {
    final child = GestureDetector(
      onTap: () => print("tap"),
      child: Container(width: 300, height: 300, color: Colors.red),
    );
    return Row(
      children: [
        ConstrainedBox(
          constraints: BoxConstraints.tight(Size(100, 100)),
          child: SizedBox(
            width: 50,
            height: 50,
            child: child,
          ),
        ),
        Padding(
          padding: const EdgeInsets.only(left: 8),
          child: ConstrainedBox(
            constraints: BoxConstraints.tight(Size(100, 100)),
            child: AccurateSizedBox(
              width: 50,
              height: 50,
              child: child,
            ),
          ),
        ),
      ],
    );
  }
}
The output is shown in Figure :
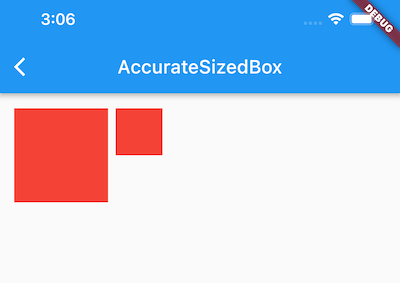
We can see that when the parent component constrains the size of the child component to 100, specifying the size of the Container as 50×50 through SizedBox is unsuccessful, while it is successful when using AccurateSizedBox.
One point to remind readers is that if a component's sizedByParent is true, it can also set parentUsesSize to true when laying out its child components. sizedByParent being true indicates that it serves as a layout boundary, while setting parentUsesSize to either true or false determines whether the child component is a layout boundary; these two aspects do not contradict each other, and this should not be confused. Additionally, it is worth mentioning that in the implementation of Flutter's built-in OverflowBox component, its sizedByParent is true, and it passes true for parentUsesSize when calling the layout method of its child components. Readers can refer to the source code of OverflowBox for more details.
6 AfterLayout
We introduced AfterLayout in Chapter 4 (also used in Section 9.4 - Hero Animation), and now let’s explore its implementation principles.
AfterLayout allows us to access the proxy render object of child components (RenderAfterLayout) after the layout is completed. The RenderAfterLayout object proxies the child component's render object, enabling us to retrieve properties from the child’s render object, such as size and position.
The implementation code for AfterLayout is as follows:
class AfterLayout extends SingleChildRenderObjectWidget {
  AfterLayout({
    Key? key,
    required this.callback,
    Widget? child,
  }) : super(key: key, child: child);

  @override
  RenderObject createRenderObject(BuildContext context) {
    return RenderAfterLayout(callback);
  }

  @override
  void updateRenderObject(
      BuildContext context, RenderAfterLayout renderObject) {
    renderObject..callback = callback;
  }
  /// This is triggered after the component tree layout is complete; note that it does not trigger after the current component's layout.
  final ValueSetter<RenderAfterLayout> callback;
}

class RenderAfterLayout extends RenderProxyBox {
  RenderAfterLayout(this.callback);

  ValueSetter<RenderAfterLayout> callback;

  @override
  void performLayout() {
    super.performLayout();
    // The callback cannot be called directly because other components may not have completed their layouts after the current component is done.
    // If the callback includes UI update triggers (like calling setState), it will cause an error. Therefore, we trigger the callback at the end of the frame.
    SchedulerBinding.instance
        .addPostFrameCallback((timeStamp) => callback(this));
  }

  /// The starting point (offset) of the component in screen coordinates.
  Offset get offset => localToGlobal(Offset.zero);
  /// The rectangular area occupied by the component on the screen.
  Rect get rect => offset & size;
}
There are three important points to note in the code above:
The timing of the
callbackinvocation is not immediately after the child component's layout is complete. This is because, after the child completes its layout, other components may still be unlaid out. Calling the callback at this point may trigger updates (likesetState), causing errors. Therefore, we invoke the callback at the end of the frame.The
performLayoutmethod ofRenderAfterLayoutdirectly calls theperformLayoutmethod of its superclassRenderProxyBox:
void performLayout() {
  if (child != null) {
    child!.layout(constraints, parentUsesSize: true);
    size = child!.size;
  } else {
    size = computeSizeForNoChild(constraints);
  }
}
Here, the constraints passed from the parent are directly transmitted to the child component, and the child’s size is set to match its own size. This means that the size of RenderAfterLayout is the same as that of its child.
We defined two properties,
offsetandrect, which represent the component's position offset and the rectangular area it occupies on the screen. However, in practice, we often need to obtain the coordinates and rectangular area of the child component relative to a specific parent component. In this case, we can call thelocalToGlobalmethod ofRenderObject. For example, the following code demonstrates how a child component in aStackobtains its rectangular area relative to theStack:
...
Widget build(context) {
  return Stack(
    alignment: AlignmentDirectional.topCenter,
    children: [
      AfterLayout(
        callback: (renderAfterLayout) {
         // We need to get the Rect of the AfterLayout child relative to the Stack.
         _rect = renderAfterLayout.localToGlobal(
            Offset.zero,
            // Find the corresponding RenderObject of the Stack.
            ancestor: context.findRenderObject(),
          ) & renderAfterLayout.size;
        },
        child: Text('Flutter@wendux'),
      ),
    ]
  );
}
7 Further Discussion on Constraints
Constraints mainly describe the limits of minimum and maximum width and height. Understanding how components determine their own size or that of their child nodes based on constraints during the layout process greatly aids our comprehension of component layout behavior. Let’s illustrate this with an example of implementing a 200x200 red Container. To avoid interference, we will have the root node (RenderView) serve as the parent component of the Container. Our code is:
Container(width: 200, height: 200, color: Colors.red)
However, after running the code, you may find that the entire screen turns red! Why is that? Let’s take a look at the layout implementation of RenderView:
@override
void performLayout() {
  // configuration.size represents the current device screen size.
  _size = configuration.size;
  if (child != null)
    child!.layout(BoxConstraints.tight(_size)); // Forces the child component to be the same size as the screen.
}
Here, we need to introduce two commonly used types of constraints:
Loose Constraints: There are no restrictions on minimum width and height (set to 0), only maximum width and height limits. They can be quickly created using
BoxConstraints.loose(Size size).Tight Constraints: These set fixed sizes; that is, minimum width equals maximum width, and minimum height equals maximum height. They can be quickly created using
BoxConstraints.tight(Size size).
As we can see, RenderView passes a tight constraint to its child, forcing its size to match the screen size, which causes the Container to fill the screen. So how can we ensure that the specified size is effective? The standard solution is to introduce an intermediate component that adheres to the constraints of the parent component and then passes new constraints to the child component. For this example, the simplest way is to wrap the Container with an Align component:
@override
Widget build(BuildContext context) {
  var container = Container(width: 200, height: 200, color: Colors.red);
  return Align(
    child: container,
    alignment: Alignment.topLeft,
  );
}
The Align component will adhere to the constraints of RenderView, filling the screen, and then provide the child with loose constraints (minimum and maximum width and height of 0 and 200, respectively). This way, the Container can become 200x200.
Of course, we could also use other components instead of Align, such as UnconstrainedBox, but the principle remains the same, and readers can verify this by checking the source code.
8 Summary
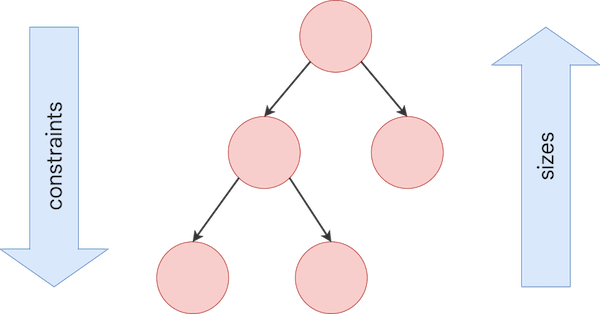
Through this section, you should now be familiar with the layout process in Flutter. Let’s take a look at an illustration from the official Flutter website (Figure):
Now, let’s revisit the official explanation about Flutter layout:
“During layout, Flutter traverses the rendering tree using a DFS (depth-first search) approach, passing constraints from parent nodes to child nodes in a top-down manner. To determine its size, a child node must adhere to the constraints passed by its parent. The child node responds by passing its size back to the parent within the constraints established by the parent.”
Isn't it a bit clearer now?
