8.1 Creating a Flutter Application Template
1. Creating the Application
Use either Android Studio or VS Code to create a new Flutter project named "first_flutter_app". Once created, you will have a default counter app example.
Note that the default counter example might change depending on the version of the Flutter plugin in your editor. However, in this section, we will go through the full code of the counter example, so any changes won’t affect this example.
Let’s first run the newly created project. The result is shown in Figure :
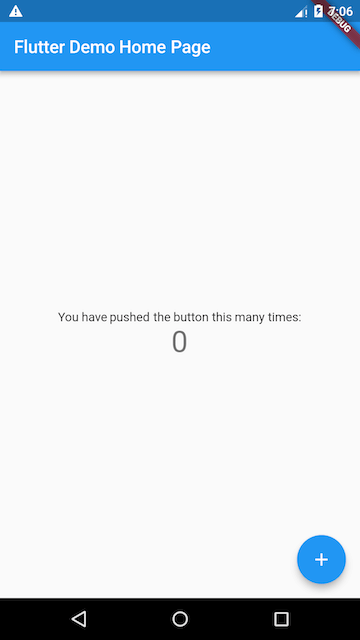
In this counter example, every time you tap the floating button with a "+" symbol at the bottom right, the number in the center of the screen increases by 1.
In this example, the main Dart code is in the lib/main.dart file. Below is the source code:
class MyApp extends StatelessWidget {
  @override
  Widget build(BuildContext context) {
    return MaterialApp(
      title: 'Flutter Demo',
      theme: ThemeData(
        primarySwatch: Colors.blue,
      ),
      home: MyHomePage(title: 'Flutter Demo Home Page'),
    );
  }
}

class MyHomePage extends StatefulWidget {
  MyHomePage({Key? key, required this.title}) : super(key: key);
  final String title;

  @override
  _MyHomePageState createState() => _MyHomePageState();
}

class _MyHomePageState extends State<MyHomePage> {
  int _counter = 0;

  void _incrementCounter() {
    setState(() {
      _counter++;
    });
  }

  @override
  Widget build(BuildContext context) {
    return Scaffold(
      appBar: AppBar(
        title: Text(widget.title),
      ),
      body: Center(
        child: Column(
          mainAxisAlignment: MainAxisAlignment.center,
          children: <Widget>[
            Text('You have pushed the button this many times:'),
            Text(
              '$_counter',
              style: Theme.of(context).textTheme.headline4,
            ),
          ],
        ),
      ),
      floatingActionButton: FloatingActionButton(
        onPressed: _incrementCounter,
        tooltip: 'Increment',
        child: Icon(Icons.add),
      ),
    );
  }
}
2. Code Analysis
1) Importing Packages
import 'package:flutter/material.dart';
This line imports the Material UI component library. Material is a standard visual design language for mobile and web platforms. Flutter provides a rich set of Material-style UI components by default.
2) Application Entry Point
void main() => runApp(MyApp());
Similar to C/C++ or Java, the main function in a Flutter application is the entry point. The main function calls the runApp method, which starts the Flutter application. runApp takes a Widget as its argument, which in this case is a MyApp object—the root component of the Flutter app.
You only need to know for now that runApp is the entry point for Flutter apps. We’ll explore the app startup process in detail later in the principles section of this book.
The main function uses the => symbol, which is a shorthand for single-line functions or methods in Dart.
3) Application Structure
class MyApp extends StatelessWidget {
  @override
  Widget build(BuildContext context) {
    return MaterialApp(
      title: 'Flutter Demo',
      theme: ThemeData(
        primarySwatch: Colors.blue,
      ),
      home: MyHomePage(title: 'Flutter Demo Home Page'),
    );
  }
}
The MyApp class represents the Flutter application and extends the StatelessWidget class, which means the app itself is also a widget.
In Flutter, most things are widgets, including alignment (Align), padding (Padding), gesture detection (GestureDetector), and more. These are all provided in widget form.
When Flutter builds the UI, it calls the widget’s build method. The primary job of a widget is to provide a build() method that describes how to construct the UI, usually by composing or assembling other basic widgets.
MaterialApp is a framework provided by the Material library in Flutter, through which you can set the app’s name, theme, language, home page, and route list. MaterialApp is itself a widget.
The home property specifies the home page of the Flutter app, which is also a widget.
8.2 Home Page
1. Introduction to Widgets
class MyHomePage extends StatefulWidget {
  MyHomePage({Key? key, required this.title}) : super(key: key);
  final String title;

  @override
  _MyHomePageState createState() => _MyHomePageState();
}

class _MyHomePageState extends State<MyHomePage> {
 ...
}
MyHomePage is the home page of the app and extends the StatefulWidget class, which means it is a stateful widget. We will cover stateful widgets in more detail in the “2.2 Widget Introduction” section. For now, just understand that stateful widgets differ from stateless widgets in two key ways:
Stateful widgets can have states that change during the widget’s lifecycle, while stateless widgets cannot.
Stateful widgets are composed of at least two classes:
A
StatefulWidgetclass.A
Stateclass. TheStatefulWidgetclass itself is immutable, but the state held in theStateclass can change during the widget’s lifecycle.
The _MyHomePageState class is the corresponding state class for MyHomePage. You may notice that unlike the MyApp class, the MyHomePage class does not have a build method. Instead, the build method has been moved to _MyHomePageState. We’ll explain why later after reviewing the full code.
2. State Class
1) Analysis of the _MyHomePageState Class
The _MyHomePageState class contains the following key elements:
State of the component:
Since we only need to maintain a counter for button clicks, we define a _counter state:
int _counter = 0; // Tracks the total number of button clicks
This _counter stores the number of times the button with the "+" icon has been clicked.
Function to increment the state:
void _incrementCounter() {
  setState(() {
     _counter++;
  });
}
When the button is clicked, this function is called. It increments _counter and then calls the setState method. The setState method notifies the Flutter framework that the state has changed. Flutter then calls the build method to rebuild the UI with the updated state. Flutter optimizes this process, making re-executing the build method fast. This allows you to reconstruct anything that needs to be updated without manually modifying individual widgets.
UI construction in the
buildmethod:
The logic for building the UI is in the build method. When MyHomePage is first created, the _MyHomePageState class is instantiated. After initialization, the Flutter framework calls the widget’s build method to construct the widget tree, which is ultimately rendered on the device's screen. Let’s look at what the build method does:
Widget build(BuildContext context) {
  return Scaffold(
    appBar: AppBar(
      title: Text(widget.title),
    ),
    body: Center(
      child: Column(
        mainAxisAlignment: MainAxisAlignment.center,
        children: <Widget>[
          Text('You have pushed the button this many times:'),
          Text(
            '$_counter',
            style: Theme.of(context).textTheme.headline4,
          ),
        ],
      ),
    ),
    floatingActionButton: FloatingActionButton(
      onPressed: _incrementCounter,
      tooltip: 'Increment',
      child: Icon(Icons.add),
    ),
  );
}
Scaffold is a framework provided by the Material library that offers a default navigation bar, title, and the main screen body that contains the widget tree. The widget tree can be complex. In later examples, we will use Scaffold for routing.
The widget tree within the body property contains a Center widget, which aligns its child widget tree to the center of the screen. In this example, the Center widget’s child is a Column widget, which aligns all its child widgets vertically. In this example, the two Text widgets display a fixed message and the value of the _counter state.
The floatingActionButton is the "+" floating button in the bottom-right corner of the page. Its onPressed property takes a callback function that defines what happens when the button is clicked. In this example, the _incrementCounter method is assigned as the button's handler.
Now, let’s summarize the flow of the counter: when the floatingActionButton is clicked, the _incrementCounter method is called. In this method, _counter is incremented, and setState notifies Flutter that the state has changed. Flutter then calls the build method to rebuild the UI with the new state, which is then displayed on the device screen.
2) Why Should the build Method Be Placed in State Rather Than in StatefulWidget?
Now, let’s answer the earlier question: why is the build() method placed in State (instead of StatefulWidget)? This is primarily to enhance development flexibility. If the build() method were placed in StatefulWidget, it would lead to two issues:
Inconvenient State Access
Imagine if our StatefulWidget has many states, and we need to call the build method every time a state changes. Since the state is stored in State, if the build method is in StatefulWidget, then the build method and state would exist in two separate classes, making it cumbersome to access the state during construction.
For instance, if the build method were indeed in StatefulWidget, the user interface construction process would need to rely on State, requiring the build method to accept a State parameter, like this:
Widget build(BuildContext context, State state) {
    // state.counter
    ...
}
In this case, all states of State would need to be declared as public to be accessible from outside the State class. However, making the state public removes its privacy, potentially leading to uncontrollable modifications to the state. Conversely, if the build() method is placed in State, the construction process can directly access the state without needing to expose private states, making it much more convenient.
Inconvenience in Inheriting StatefulWidget
For example, Flutter has a base class for animated widgets called AnimatedWidget, which inherits from StatefulWidget. The AnimatedWidget introduces an abstract method build(BuildContext context), which all animated widgets inheriting from AnimatedWidget must implement. Now, imagine if the StatefulWidget class already has a build method, as mentioned earlier. In this case, the build method would need to accept a State object, which would mean AnimatedWidget must provide its State object (let's call it _animatedWidgetState) to its subclasses because the subclasses need to call the parent class's build method in their own build methods. The code might look like this:
class MyAnimationWidget extends AnimatedWidget {
    @override
    Widget build(BuildContext context, State state) {
        // Since the subclass needs to use AnimatedWidget's state object _animatedWidgetState,
        // AnimatedWidget must somehow expose its state object _animatedWidgetState
        super.build(context, _animatedWidgetState);
    }
}
This clearly seems unreasonable because:
The state object of
AnimatedWidgetis an internal implementation detail and should not be exposed externally.
If the parent class's state is to be exposed to the subclass, a transmission mechanism must be created, which is meaningless because the transfer of state between parent and child classes is unrelated to the logic of the subclass itself.
In summary, it can be observed that for StatefulWidget, placing the build method in State greatly enhances development flexibility.
![[C++ Chapter] Setting Sail—An Introduction to C++ (Part 2)](/static/upload/image/20241120/1732094910609611.jpg)
