When introducing Row and Column, if a child widget exceeds the screen bounds, an overflow error will occur, as shown below:
Row(
  children: <Widget>[
    Text("xxx" * 100),
  ],
);
The result is shown in Figure :
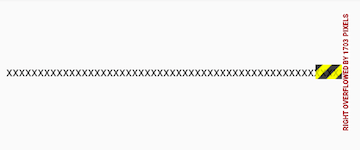
As you can see, the overflow on the right causes an error. This happens because Row only allows one line by default, and if the content exceeds the screen, it won’t wrap. We call layouts that automatically wrap content when it exceeds the screen a "flow layout." In Flutter, flow layouts are supported by Wrap and Flow. If we replace the Row with Wrap in the above example, the overflowing content will wrap automatically. Let's now introduce Wrap and Flow separately.
26.1 Wrap
Here’s the definition of Wrap:
Wrap({
  ...
  this.direction = Axis.horizontal,
  this.alignment = WrapAlignment.start,
  this.spacing = 0.0,
  this.runAlignment = WrapAlignment.start,
  this.runSpacing = 0.0,
  this.crossAxisAlignment = WrapCrossAlignment.start,
  this.textDirection,
  this.verticalDirection = VerticalDirection.down,
  List<Widget> children = const <Widget>[],
})
As we can see, many of the properties of Wrap also exist in Row (including Flex and Column), such as direction, crossAxisAlignment, textDirection, and verticalDirection. These parameters have the same meaning, so we won’t repeat their explanations here. Readers can refer to the earlier sections on Row. You can think of Wrap and Flex (including Row and Column) as behaving similarly, except that Wrap will wrap content if it exceeds the display bounds. Let’s take a look at a few properties unique to Wrap:
-
spacing: The spacing between child widgets along the main axis. -
runSpacing: The spacing along the cross axis. -
runAlignment: The alignment of child widgets along the cross axis.
Here’s an example:
Wrap(
  spacing: 8.0, // Spacing along the main (horizontal) axis
  runSpacing: 4.0, // Spacing along the cross (vertical) axis
  alignment: WrapAlignment.center, // Center alignment along the main axis
  children: <Widget>[
    Chip(
      avatar: CircleAvatar(backgroundColor: Colors.blue, child: Text('A')),
      label: Text('Hamilton'),
    ),
    Chip(
      avatar: CircleAvatar(backgroundColor: Colors.blue, child: Text('M')),
      label: Text('Lafayette'),
    ),
    Chip(
      avatar: CircleAvatar(backgroundColor: Colors.blue, child: Text('H')),
      label: Text('Mulligan'),
    ),
    Chip(
      avatar: CircleAvatar(backgroundColor: Colors.blue, child: Text('J')),
      label: Text('Laurens'),
    ),
  ],
);
The result is shown in Figure :

26.2 Flow
We rarely use Flow because it’s quite complex and requires us to manually implement the position of child widgets. In many scenarios, it’s better to first consider whether Wrap can meet your needs. Flow is mainly used in cases where custom layout strategies or high performance (such as in animations) are required. Flow has the following advantages:
-
Performance:
Flowis a highly efficient widget for adjusting the size and position of its children. It optimizes positioning by using transformation matrices. OnceFlowpositions its children, if the size or position of a child changes, thepaintChildren()method inFlowDelegatewill callcontext.paintChild()for redrawing, and this uses the transformation matrix without actually adjusting the widget’s position. -
Flexibility: Since we have to implement the
paintChildren()method inFlowDelegateourselves, we can calculate the position of each child manually, allowing for custom layout strategies.
However, there are some disadvantages:
-
Complexity: It’s difficult to use.
-
Lack of auto-sizing:
Flowdoes not automatically adapt to the size of its children. You must either specify the parent container size or return a fixed size from thegetSize()method ofFlowDelegate.
Here’s an example:
We’ll create a custom flow layout for six colored blocks:
Flow(
  delegate: TestFlowDelegate(margin: EdgeInsets.all(10.0)),
  children: <Widget>[
    Container(width: 80.0, height: 80.0, color: Colors.red),
    Container(width: 80.0, height: 80.0, color: Colors.green),
    Container(width: 80.0, height: 80.0, color: Colors.blue),
    Container(width: 80.0, height: 80.0, color: Colors.yellow),
    Container(width: 80.0, height: 80.0, color: Colors.brown),
    Container(width: 80.0, height: 80.0, color: Colors.purple),
  ],
);
Now, let’s implement TestFlowDelegate:
class TestFlowDelegate extends FlowDelegate {
  EdgeInsets margin;

  TestFlowDelegate({this.margin = EdgeInsets.zero});

  double width = 0;
  double height = 0;

  @override
  void paintChildren(FlowPaintingContext context) {
    var x = margin.left;
    var y = margin.top;
    // Calculate the position of each child widget
    for (int i = 0; i < context.childCount; i++) {
      var w = context.getChildSize(i)!.width + x + margin.right;
      if (w < context.size.width) {
        context.paintChild(i, transform: Matrix4.translationValues(x, y, 0.0));
        x = w + margin.left;
      } else {
        x = margin.left;
        y += context.getChildSize(i)!.height + margin.top + margin.bottom;
        // Paint the child widget (optimized)
        context.paintChild(i, transform: Matrix4.translationValues(x, y, 0.0));
        x += context.getChildSize(i)!.width + margin.left + margin.right;
      }
    }
  }

  @override
  Size getSize(BoxConstraints constraints) {
    // Specify the size of Flow; for simplicity, we set the width to the maximum and the height to 200.
    // In actual development, the size of Flow should be based on the dimensions of its children.
    return Size(double.infinity, 200.0);
  }

  @override
  bool shouldRepaint(FlowDelegate oldDelegate) {
    return oldDelegate != this;
  }
}
The result is shown in Figure :
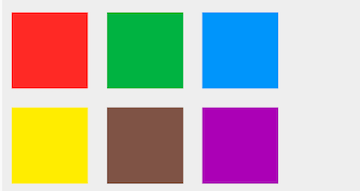
As you can see, our main task is to implement paintChildren(), which determines the position of each child widget. Since Flow doesn’t adapt to the size of its children, we specify a fixed size for Flow by returning a fixed value from getSize().
Note that if you need a custom layout strategy, the recommended approach is to directly inherit from RenderObject and implement custom layout logic by overriding the performLayout() method. This will be covered in Section 14.4 (Layout) later in the book.

