In this section, we will explain the Sliver layout protocol and the process of creating custom Slivers by customizing two Slivers.
47.1 Sliver Layout Protocol
The layout protocol for Sliver is as follows:
The Viewport passes the current layout and configuration information to the Sliver through
SliverConstraints.The Sliver determines its position, rendering, and other information, which is stored in
geometry(aSliverGeometryobject).The Viewport reads the information from
geometryto layout and render the Sliver.
As you can see, two important objects are involved in this process: SliverConstraints and SliverGeometry. Let's first look at the definition of SliverConstraints:
class SliverConstraints extends Constraints {
    // Main axis direction
    AxisDirection? axisDirection;
    // Direction in which the Sliver grows along the main axis: forward or reverse
    GrowthDirection? growthDirection;
    // The direction of user scroll
    ScrollDirection? userScrollDirection;
    // Total theoretical offset of the Sliver that has scrolled out of view (it may be pinned to the top)
    double? scrollOffset;
    // Total height occupied by Slivers before this one. If lazy-loading makes it hard to estimate, this value is double.infinity
    double? precedingScrollExtent;
    // Length by which the previous Sliver overlaps this one (useful when pinned/floating or at list start/end)
    double? overlap;
    // The maximum drawable area in the Viewport for the current Sliver
    double? remainingPaintExtent;
    // Cross-axis length; represents the width of the list if the scroll direction is vertical
    double? crossAxisExtent;
    // Cross-axis direction
    AxisDirection? crossAxisDirection;
    // Main axis length of the Viewport; represents the height of the list if the scroll direction is vertical
    double? viewportMainAxisExtent;
    // Start point of the pre-render area of the Viewport [-Viewport.cacheExtent, 0]
    double? cacheOrigin;
    // Length of the Viewport loading area, ranging from:
    // [viewportMainAxisExtent, viewportMainAxisExtent + Viewport.cacheExtent * 2]
    double? remainingCacheExtent;
}
As we can see, SliverConstraints contains a lot of information. When a list is scrolled and a Sliver enters the area that needs to be constructed, the list passes the SliverConstraints information to the Sliver. The Sliver can then determine its layout and rendering information based on this.
Next, the Sliver needs to define its SliverGeometry:
const SliverGeometry({
  this.scrollExtent = 0.0, // Estimated length of the Sliver along the main axis
  this.paintExtent = 0.0, // Drawing length in the visible area
  this.paintOrigin = 0.0, // Drawing origin relative to the layout position
  double? layoutExtent, // Length occupied in the Viewport
  this.maxPaintExtent = 0.0, // Maximum drawable length
  this.maxScrollObstructionExtent = 0.0,
  double? hitTestExtent, // Hit test area
  bool? visible, // Whether the Sliver is visible
  this.hasVisualOverflow = false, // Whether the Sliver overflows the Viewport
  this.scrollOffsetCorrection, // Adjustment value for scrollExtent to avoid jumps during layout changes
  double? cacheExtent, // Length occupied in the pre-render area
})
Sliver Layout Model vs Box Layout Model
Both layout processes are essentially the same: the parent widget passes constraint information to the child, the child determines its size based on the parent’s constraints, and the parent adjusts its position based on the child’s size. The differences are:
The constraint information passed from the parent to the child is different. The Box model uses
BoxConstraints, while the Sliver model usesSliverConstraints.The objects describing the child’s layout information differ. The Box model uses
SizeandOffset, while the Sliver model usesSliverGeometry.The starting point of the layout differs. Slivers generally start from the Viewport, while the Box model can start from any widget.
SliverConstraints and SliverGeometry have many properties, which may not be easily understood just by reading them. Below, we will use two examples to understand them through practice.
47.2 Custom Sliver (1) SliverFlexibleHeader
1. SliverFlexibleHeader
We will implement a feature similar to the top image in the old version of WeChat Moments: by default, the top image only shows part of itself, and when the user pulls down, the remaining part of the image gradually reveals itself, as shown in Figure .

Our approach is to create a Sliver and make it the first child of a CustomScrollView. Then, we will dynamically adjust the layout and display of the Sliver based on user scrolling. Let's implement a SliverFlexibleHeader that will work with CustomScrollView to achieve this effect. First, let’s look at the overall implementation code of the page:
@override
Widget build(BuildContext context) {
  return CustomScrollView(
    // To allow the CustomScrollView to continue pulling down after reaching the top, we must enable a bouncing effect
    physics: const BouncingScrollPhysics(parent: AlwaysScrollableScrollPhysics()),
    slivers: [
      // The SliverFlexibleHeader component we need to implement
      SliverFlexibleHeader(
        visibleExtent: 200, // The height occupied in the list in the initial state
        // To customize the layout based on the pull-down state, we use a builder to dynamically construct the layout.
        builder: (context, availableHeight, direction) {
          return GestureDetector(
            onTap: () => print('tap'), // Test to see if the event is responsive
            child: Image(
              image: AssetImage("imgs/avatar.png"),
              width: 50.0,
              height: availableHeight,
              alignment: Alignment.bottomCenter,
              fit: BoxFit.cover,
            ),
          );
        },
      ),
      // Build a list
      buildSliverList(30),
    ],
  );
}
Next, our focus is on implementing SliverFlexibleHeader. Due to the complexities of Sliver layouts, it is challenging to achieve the desired functionality with existing components, so we will implement it by customizing a RenderObject. To dynamically adjust based on the pull-down position, we will use a builder to construct the layout, which will be called back when the pull-down position changes.
For clarity, we will first implement a _SliverFlexibleHeader component that receives a fixed widget. The component definition is as follows:
class _SliverFlexibleHeader extends SingleChildRenderObjectWidget {
  const _SliverFlexibleHeader({
    Key? key,
    required Widget child,
    this.visibleExtent = 0,
  }) : super(key: key, child: child);
  final double visibleExtent;

  @override
  RenderObject createRenderObject(BuildContext context) {
   return _FlexibleHeaderRenderSliver(visibleExtent);
  }

  @override
  void updateRenderObject(
      BuildContext context, _FlexibleHeaderRenderSliver renderObject) {
    renderObject..visibleExtent = visibleExtent;
  }
}
Here, we are inheriting from neither StatelessWidget nor StatefulWidget because these two components primarily serve to compose widgets. Instead, we need to inherit from RenderObjectWidget since we want to customize a RenderObject. Considering that _SliverFlexibleHeader has a single child, we can directly inherit from SingleChildRenderObjectWidget, which allows us to avoid some code unrelated to layout, such as rendering and event hit testing, as these functionalities are already handled by SingleChildRenderObjectWidget.
Next, we will implement _FlexibleHeaderRenderSliver, with the core code found in performLayout. Readers can refer to the comments:
class _FlexibleHeaderRenderSliver extends RenderSliverSingleBoxAdapter {
    _FlexibleHeaderRenderSliver(double visibleExtent)
      : _visibleExtent = visibleExtent;

  double _lastOverScroll = 0;
  double _lastScrollOffset = 0;
  late double _visibleExtent = 0;

  set visibleExtent(double value) {
    // Update state and layout when the visible length changes
    if (_visibleExtent != value) {
      _lastOverScroll = 0;
      _visibleExtent = value;
      markNeedsLayout();
    }
  }

  @override
  void performLayout() {
    // If the scroll offset is greater than _visibleExtent, the child is outside the screen
    if (child == null || (constraints.scrollOffset > _visibleExtent)) {
      geometry = SliverGeometry(scrollExtent: _visibleExtent);
      return;
    }

    // Test overlap; it will vary during the pull-down process
    double overScroll = constraints.overlap < 0 ? constraints.overlap.abs() : 0;
    var scrollOffset = constraints.scrollOffset;

    // The visible space at the top of the Viewport is the maximum area drawable for this Sliver.
    // 1. If the Sliver has already scrolled out of view, constraints.scrollOffset will be greater than _visibleExtent,
    //    we check for this at the start.
    // 2. If we pull down beyond the boundary, overScroll > 0 and scrollOffset will be 0, so the final drawable area is
    //    _visibleExtent + overScroll.
    double paintExtent = _visibleExtent + overScroll - constraints.scrollOffset;
    // Drawing height should not exceed the maximum drawable space
    paintExtent = min(paintExtent, constraints.remainingPaintExtent);

    // Layout the child; we will detail the layout process in a later chapter on layout principles, but for now,
    // just know that the child can access the constraints we passed through LayoutBuilder (ExtraInfoBoxConstraints).
    child!.layout(
      constraints.asBoxConstraints(maxExtent: paintExtent),
      parentUsesSize: false,
    );

    // Maximum is _visibleExtent, minimum is 0
    double layoutExtent = min(_visibleExtent, paintExtent);

    // Set geometry, which will be used by the Viewport during layout
    geometry = SliverGeometry(
      scrollExtent: layoutExtent,
      paintOrigin: -overScroll,
      paintExtent: paintExtent,
      maxPaintExtent: paintExtent,
      layoutExtent: layoutExtent,
    );
  }
}
In performLayout, we determine the layout and rendering information of _SliverFlexibleHeader by combining the SliverConstraints passed from the Viewport with the height of the child. These details are stored in geometry, allowing the Viewport to read it and determine the position of _SliverFlexibleHeader for rendering. Readers can manually modify the properties of SliverGeometry to see the effects and deepen their understanding.
Now, there’s one last question: since _SliverFlexibleHeader receives a fixed widget, how can we rebuild the widget when the pull-down position changes? In the code above, we call layout on its child whenever the pull-down position changes in the performLayout method of _SliverFlexibleHeader. Thus, we can create a LayoutBuilder to dynamically construct the child when the child is relaid out. With this idea, the implementation is straightforward. Let’s look at the final implementation of SliverFlexibleHeader:
typedef SliverFlexibleHeaderBuilder = Widget Function(
  BuildContext context,
  double maxExtent,
  // ScrollDirection direction,
);

class SliverFlexibleHeader extends StatelessWidget {
  const SliverFlexibleHeader({
    Key? key,
    this.visibleExtent = 0,
    required this.builder,
  }) : super(key: key);

  final SliverFlexibleHeaderBuilder builder;
  final double visibleExtent;

  @override
  Widget build(BuildContext context) {
    return _SliverFlexibleHeader(
      visibleExtent: visibleExtent,
      child: LayoutBuilder(
        builder: (BuildContext context, BoxConstraints constraints) {
          return builder(
            context,
            constraints.maxHeight
          );
        },
      ),
    );
  }
}
Each time SliverFlexibleHeader lays out its child, it will trigger the LayoutBuilder to rebuild the child widget. The constraints received in LayoutBuilder are those passed to the child during layout in _SliverFlexibleHeader, specifically:
...
child!.layout(
  // Layout the child
  constraints.asBoxConstraints(maxExtent: paintExtent),
  parentUsesSize: true,
);
...
2. Passing Additional Layout Information
When using SliverFlexibleHeader in practice, sometimes we may need to rely on the current scroll direction of the list when constructing the child widget. Although we could record the difference between the previous and current availableHeight values in the builder of SliverFlexibleHeader to determine the scroll direction, this approach is cumbersome, as it requires the developer to handle it manually.
We know that during scrolling, SliverConstraints within a Sliver already contains the userScrollDirection. If we could process it uniformly and pass it transparently to LayoutBuilder, that would simplify things, and developers wouldn’t need to manage the scroll direction themselves! Based on this idea, let's implement it.
The first problem we encounter is that we cannot specify the parameters passed to LayoutBuilder. To address this, I came up with two solutions:
We know that in the above scenario, while laying out the child widget, the constraints we pass to it only use the maximum length, while the minimum length is unused. We could pass the scroll direction via the minimum length to
LayoutBuilderand then retrieve it there.We can define a new class that inherits from
BoxConstraintsand adds a property to storescrollDirection.
I tried both approaches, and both worked. But which should we use? I recommend using solution 2 because solution 1 has a side effect—it affects the layout of the child widget. We know that LayoutBuilder is executed during the child widget’s build phase, and although we don’t use the minimum length during the build phase, it still applies this constraint during the layout phase of the child widget, which can affect its layout.
Let's implement solution 2. We define an ExtraInfoBoxConstraints class that can carry additional information beyond the standard constraints. To make it as general as possible, we use generics:
class ExtraInfoBoxConstraints<T> extends BoxConstraints {
  ExtraInfoBoxConstraints(
    this.extra,
    BoxConstraints constraints,
  ) : super(
          minWidth: constraints.minWidth,
          minHeight: constraints.minHeight,
          maxWidth: constraints.maxWidth,
          maxHeight: constraints.maxHeight,
        );

  // Additional information
  final T extra;

  @override
  bool operator ==(Object other) {
    if (identical(this, other)) return true;
    return other is ExtraInfoBoxConstraints &&
        super == other &&
        other.extra == extra;
  }

  @override
  int get hashCode {
    return hashValues(super.hashCode, extra);
  }
}
The code above is straightforward. It’s important to note that we override the “==” operator. This is because, during the layout phase, Flutter may check whether the constraints before and after are equal under certain circumstances to decide whether to relayout. So, we need to override the "==" operator. Otherwise, if the maximum/minimum width or height stays the same but extra changes, it might not trigger a child relayout, and hence LayoutBuilder won't be triggered, which is contrary to our expectation. We want LayoutBuilder to rebuild the child whenever extra changes.
Next, we modify the performLayout method of _FlexibleHeaderRenderSliver:
...
  // Layout the child. The child can access the constraints object (ExtraInfoBoxConstraints) via LayoutBuilder.
  child!.layout(
    ExtraInfoBoxConstraints(
      direction, // Passing scroll direction
      constraints.asBoxConstraints(maxExtent: paintExtent),
    ),
    parentUsesSize: false,
  );
...
Now, we modify the implementation of SliverFlexibleHeader to retrieve the scroll direction in LayoutBuilder:
typedef SliverFlexibleHeaderBuilder = Widget Function(
  BuildContext context,
  double maxExtent,
  ScrollDirection direction,
);

class SliverFlexibleHeader extends StatelessWidget {
  const SliverFlexibleHeader({
    Key? key,
    this.visibleExtent = 0,
    required this.builder,
  }) : super(key: key);

  final SliverFlexibleHeaderBuilder builder;
  final double visibleExtent;

  @override
  Widget build(BuildContext context) {
    return _SliverFlexibleHeader(
      visibleExtent: visibleExtent,
      child: LayoutBuilder(
        builder: (BuildContext context, BoxConstraints constraints) {
          return builder(
            context,
            constraints.maxHeight,
            // Retrieve scroll direction
            (constraints as ExtraInfoBoxConstraints<ScrollDirection>).extra,
          );
        },
      ),
    );
  }
}
Finally, let's take a look at the logic in SliverFlexibleHeader for determining the scroll direction:
// Overlap will keep changing during the pull-down process.
double overScroll = constraints.overlap < 0 ? constraints.overlap.abs() : 0;
var scrollOffset = constraints.scrollOffset;
_direction = ScrollDirection.idle;

// Determine the list scroll direction based on the difference between the previous and current overScroll values. Note that we cannot directly use `constraints.userScrollDirection`,
// as it only represents the user's swipe direction. For example, when we pull down beyond the boundary and release, the list will bounce back, scrolling upwards. However, since the user's action has ended, `ScrollDirection` still reflects the last user swipe direction (downwards), leading to a mismatch.
var distance = overScroll > 0
  ? overScroll - _lastOverScroll
  : _lastScrollOffset - scrollOffset;
_lastOverScroll = overScroll;
_lastScrollOffset = scrollOffset;

if (constraints.userScrollDirection == ScrollDirection.idle) {
  _direction = ScrollDirection.idle;
  _lastOverScroll = 0;
} else if (distance > 0) {
  _direction = ScrollDirection.forward;
} else if (distance < 0) {
  _direction = ScrollDirection.reverse;
}
3. Height Correction: scrollOffsetCorrection
When visibleExtent changes, we can observe the effect, as shown in Figure :

We can see a noticeable jump, which occurs because the change in visibleExtent causes the layoutExtent to change, meaning the height occupied by SliverFlexibleHeader on the screen will change, leading to a jump in the list. However, this jump is too abrupt. We know that the height of each Sliver is estimated through the scrollExtent property, so we need to correct the scrollExtent. However, we cannot directly modify the scrollExtent value, as doing so would result in no animation and still cause a jump. Fortunately, SliverGeometry provides a scrollOffsetCorrection property, which is specifically used to adjust scrollExtent. We just need to pass the correction value to scrollOffsetCorrection, and the Sliver will automatically perform an animation to transition to the desired height.
// Whether scrollOffset needs correction. When _visibleExtent is updated,
// to prevent a visual jump, we must first correct the scrollOffset.
double? _scrollOffsetCorrection;

set visibleExtent(double value) {
  // If the visible length changes, update the state and relayout
  if (_visibleExtent != value) {
    _lastOverScroll = 0;
    _reported = false;
    // Calculate correction value
    _scrollOffsetCorrection = value - _visibleExtent;
    _visibleExtent = value;
    markNeedsLayout();
  }
}

@Override
void performLayout() {
  // After _visibleExtent is updated, correct scrollOffset to prevent a sudden jump
  if (_scrollOffsetCorrection != null) {
    geometry = SliverGeometry(
      // Apply correction
      scrollOffsetCorrection: _scrollOffsetCorrection,
    );
    _scrollOffsetCorrection = null;
    return;
  }
  ...
}
After running it, the effect looks like Figure (the animated GIF might be too fast; you can directly run the example to see the effect).

4. Boundaries
When constructing child widgets in SliverFlexibleHeader, developers might rely on whether the "current available height is 0" to perform some special handling, such as recording whether the child widget has left the screen. However, according to the implementation above, when the user scrolls very quickly, the maxExtent in the constraints passed to the last layout of the child widget as it leaves the screen may not be 0. When constraints.scrollOffset is greater than _visibleExtent, we return at the beginning of the performLayout method, so the builder of LayoutBuilder may not receive a callback when maxExtent is 0.
To solve this problem, we simply need to call child.layout once every time the Sliver leaves the screen and set maxExtent to 0. To do this, we modify the following:
void performLayout() {
    if (child == null) {
      geometry = SliverGeometry(scrollExtent: _visibleExtent);
      return;
    }
    // When it has completely scrolled off the screen
    if (constraints.scrollOffset > _visibleExtent) {
      geometry = SliverGeometry(scrollExtent: _visibleExtent);
      // Notify the child to relayout. Note, notify once is enough. If we don't notify,
      // the available height the child receives in its last build before scrolling off the screen may not be 0.
      // Since developers may rely on the "current available height being 0" to perform special handling,
      // such as recording whether the child has left the screen, we need to ensure that the builder of `LayoutBuilder`
      // will be called once when leaving the screen (to construct the child widget).
      if (!_reported) {
        _reported = true;
        child!.layout(
          ExtraInfoBoxConstraints(
            _direction, // Pass scroll direction
            constraints.asBoxConstraints(maxExtent: 0),
          ),
          // We don't use the child's Size; for more details on this parameter, see the layout principle discussion later in this book
          parentUsesSize: false,
        );
      }
      return;
    }

    // The child has returned to the screen, reset notification state
    _reported = false;

  ...
}
With that, we are done!
47.3 Custom Sliver (Part 2): SliverPersistentHeaderToBox
In the previous section, we introduced SliverPersistentHeader. When using it, two rules must be followed:
You must explicitly specify a height.
If the construction of child widgets using
SliverPersistentHeaderdepends on theoverlapsContentparameter, there must be at least oneSliverPersistentHeaderorSliverAppBarbefore it.
Following these two rules can be a burden for developers. For rule 1, most of the time, we don't know the exact height of the header, and we expect that SliverPersistentHeader can automatically determine the height of the widget. As for rule 2, developers often run into issues if they are unaware of it. Given these, we will now customize a SliverPersistentHeaderToBox, which allows any RenderBox to be adapted to a Sliver that can stick to the top without explicitly specifying the height, while avoiding the issues above.
Step 1: Define SliverPersistentHeaderToBox
typedef SliverPersistentHeaderToBoxBuilder = Widget Function(
  BuildContext context,
  double maxExtent, // The current available maximum height
  bool fixed, // Whether it is already fixed to the top
);

class SliverPersistentHeaderToBox extends StatelessWidget {
  // Default constructor, directly accepts a widget without explicitly specifying the height
  SliverPersistentHeaderToBox({
    Key? key,
    required Widget child,
  })  : builder = ((a, b, c) => child),
        super(key: key);

  // Builder constructor, needs a builder, and no explicit height specification is needed
  SliverPersistentHeaderToBox.builder({
    Key? key,
    required this.builder,
  }) : super(key: key);

  final SliverPersistentHeaderToBoxBuilder builder;

  @override
  Widget build(BuildContext context) {
    return _SliverPersistentHeaderToBox(
      // Use LayoutBuilder to receive layout constraint information passed from Sliver to the child widget
      child: LayoutBuilder(
        builder: (BuildContext context, BoxConstraints constraints) {
          return builder(
            context,
            constraints.maxHeight,
            // The additional information passed in constraints is a bool indicating whether the Sliver has been fixed to the top
            (constraints as ExtraInfoBoxConstraints<bool>).extra,
          );
        },
      ),
    );
  }
}
This is similar to SliverFlexibleHeader, except that SliverPersistentHeaderToBox passes a bool in the constraints to indicate whether it has been fixed to the top.
Step 2: Implement _SliverPersistentHeaderToBox
class _RenderSliverPersistentHeaderToBox extends RenderSliverSingleBoxAdapter {
  @override
  void performLayout() {
    if (child == null) {
      geometry = SliverGeometry.zero;
      return;
    }
    child!.layout(
      ExtraInfoBoxConstraints(
        // As long as `constraints.scrollOffset` is not 0, it means content has been scrolled below the current Sliver, indicating it has been fixed to the top
        constraints.scrollOffset != 0,
        constraints.asBoxConstraints(
          // We pass the remaining paintable space as the maximum height constraint to LayoutBuilder
          maxExtent: constraints.remainingPaintExtent,
        ),
      ),
      // We need to use the child's size to determine the Sliver's size later, so `parentUsesSize` should be set to true
      parentUsesSize: true,
    );

    // After the child is laid out, we can retrieve its size
    double childExtent;
    switch (constraints.axis) {
      case Axis.horizontal:
        childExtent = child!.size.width;
        break;
      case Axis.vertical:
        childExtent = child!.size.height;
        break;
    }

    geometry = SliverGeometry(
      scrollExtent: childExtent,
      paintOrigin: 0, // Fix it; if not fixed, pass `-constraints.scrollOffset`
      paintExtent: childExtent,
      maxPaintExtent: childExtent,
    );
  }

  // Important, must override this method, explained below.
  @override
  double childMainAxisPosition(RenderBox child) => 0.0;
}
There are four key points in the code above:
When
constraints.scrollOffsetis not 0, it indicates that the Sliver has been fixed to the top.During layout, we retrieve the size of the child and determine the size of the Sliver based on it (setting the geometry), so we no longer need to explicitly specify the height.
We achieve the sticky effect by setting
paintOriginto 0. If not sticking to the top, we should pass-constraints.scrollOffset. Try experimenting with this to understand it better.We must override
childMainAxisPosition, otherwise events will fail. This method is used in "hit testing," which we will cover in section 8.1. For now, just know that the function should return the position ofpaintOrigin.
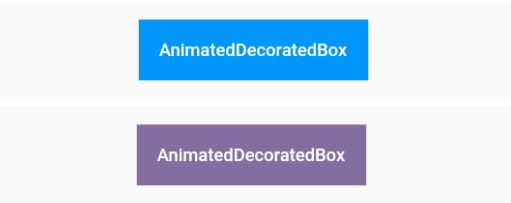
That's it! Now, let's test it. We'll create two headers:
The first header will behave like a normal list item when not fixed to the top, but when it is, it will display a shadow. To achieve this, we will use
SliverPersistentHeaderToBox.builder.The second header is a normal list item that accepts a widget.
class SliverPersistentHeaderToBoxRoute extends StatelessWidget {
  const SliverPersistentHeaderToBoxRoute({Key? key}) : super(key: key);

  @override
  Widget build(BuildContext context) {
    return CustomScrollView(
      slivers: [
        buildSliverList(5),
        SliverPersistentHeaderToBox.builder(builder: headerBuilder),
        buildSliverList(5),
        SliverPersistentHeaderToBox(child: wTitle('Title 2')),
        buildSliverList(50),
      ],
    );
  }

  // Display shadow when the header is fixed
  Widget headerBuilder(context, maxExtent, fixed) {
    // Retrieve the current theme, which we'll use to get colors.
    var theme = Theme.of(context);
    return Material(
      child: Container(
        color: fixed ? Colors.white : theme.canvasColor,
        child: wTitle('Title 1'),
      ),
      elevation: fixed ? 4 : 0,
      shadowColor: theme.appBarTheme.shadowColor,
    );
  }

  // We use a lowercase "w" at the start of a function name to represent building a widget, as it's more concise than buildXX
  Widget wTitle(String text) =>
      ListTile(title: Text(text), onTap: () => print(text));
}
The effect after running the above code is shown in Figure .

SliverPersistentHeaderToBox not only eliminates the need to explicitly specify height, but its builder function’s third parameter also behaves as expected (unrelated to the number of SliverPersistentHeaderToBox instances).
Note:If you need to use SliverAppBar, it's recommended to use SliverPersistentHeader, as it was designed specifically for SliverAppBar. Using them together will result in better coordination. If you mix SliverPersistentHeaderToBox with SliverAppBar, it may lead to other issues, so the suggestion is: If you are not using SliverAppBar, use SliverPersistentHeaderToBox. If you are, use SliverPersistentHeader.
47.4 Summary
This section introduced the Sliver layout model and compared it with the box layout model. At this point, we've covered both layout models in Flutter. By customizing SliverFlexibleHeader and SliverPersistentHeaderToBox, we demonstrated the steps involved in creating custom Slivers, which also deepened our understanding of the Sliver layout.
It is important to note that most applications' pages will involve scrollable lists, so understanding and mastering scrollable widgets and the Sliver layout protocol is essential.